October 08, 2008 by sharky
Making your own torrents from files and folders in µTorrent is easy - use the ‘Create New Torrent’ feature, browse to a folder or file, throw in a public tracker URL in the Tracker list and upload it to your favourite public torrent site for all to use. But what if you only want to share your torrents with a friend or small group of users, and not the rest of the world? µTorrent incorporates a cool feature called Embedded Tracker that allows you to create and seed your torrents privately.
Instructions:
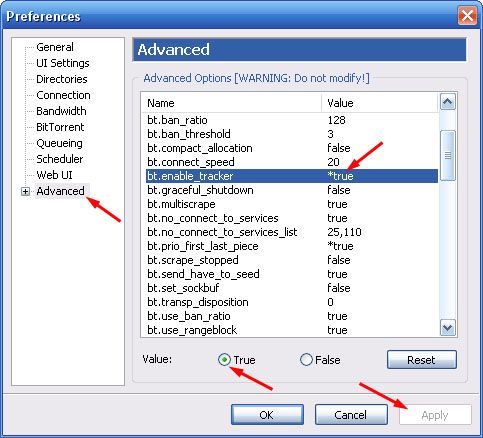
STEP 1. First, you’ll need to enable the tracker in µTorrent’s Advanced settings. Set bt.enable_tracker to "true".
STEP 2. Now, enable the uTorrent WebUI, and set up a unique listening port for your tracker. To do this, go back to Preferences, select the Web UI tab, and put a checkmark in "Enable Web UI". Enter a username & password that won’t be easy to guess (both are arbitrary, since whoever you’re planning on privately sharing the torrent with will not require this "login" information - in this scenario it’s only required for enabling the Web UI interface). Next, checkmark "Alternative listening port" and enter a port number that you don’t use for anything else (this includes µTorrent). To finish, click "Apply" to save the new changes.

NOTE: Be advised that if you’ll need to forward the port if you use a router, and/or add a firewall exception for the new port.
STEP 3. Now that Web UI is set up with a working port, you’ll be able to create your own torrents using your own tracker ‘announce’ URL. The URL for the tracker is your IP address with the port number that you used in Step 2 above (i.e. "54321"). For the first part of your tracker URL, you’ll need to find your IP address:
• If you have a static (non-changing) IP address, simply visit WhatsMyIP.com (or .org) and copy the number. Skip to Step 4.
• If you have a dynamic IP address (such as DSL Internet), it’s recommended you use your local IP address. To find this, go to your Start button, click "Run…" and type "cmd" without the quotes. At the command prompt, type "ipconfig" (no quotes). The IP that you’ll need to use is the "IPv4 address". In the event that you use multiple ethernet (NIC) cards and/or a wireless LAN, you’ll need to use the correct IPv4 address for your Internet connection.

STEP 4. Assuming you now know your IP address and have the port number from Step 3, you’re ready to create a torrent using your own tracker URL. Again, the tracker URL is your IP address, separated by a colon ( : ) with the valid port number at the end. Don’t forget you’ll need to add http:// to the beginning of the URL. You’ll also need to add "/announce" to the end of the URL to identify it as so. Following the above examples, our tracker URL would be:
http://192.161.41.1:54321/announce
Back in µTorrent, create a new torrent and add your tracker URL to it. Be sure to select "Start Seeding" and "Private torrent" (this is optional). Click "Create and save as…" and save your torrent.

That’s it! You can now share your torrent with anyone you want, and only they’ll be able to download the files.
TIP: Adding public trackers to the "Trackers" list (above) is not recommended, as it (and the files) could get indexed by that tracker, thus your torrent may end up being available publicly. Also, never enter a private tracker URL in the Trackers list, for you may get tagged for cheating. You’ll also be able to encrypt the traffic by using the "Forced" option in Preferences > BitTorrent > Protocol Encryption.
Other Implementations: This is also a great method for getting files to your seedbox, in the event that you don’t have FTP access (some universities are blocking FTP). Simply create your torrent, and seed it in uTorrent, and use your seedbox to open it up. After it’s finished downloading to your seedbox, change the tracker to reflect your private account (with passkey), or use the ‘Make Torrent’ feature.
Archived by FSFmirror
![]()
