March 05, 2008 by sharky
ProxyWay is a very good (Free) all-in-one solution for anonymous web surfing. Never again will you have to visit those slow CGI anonymous proxy websites (anonymouse.org, proxify.com). It offers the same features of a CGI proxy through software incorporated seamlessly through any web browser. The reason ProxyWay stands out among other anonymous web solutions is that it features multiple proxies working together simultaneously in the background. Not only does this put to shame the speeds of browser-based proxies, but it also acts as a dynamic proxy chain to provide an even higher level of anonymity. With ProxyWay; feel free to do your online banking or secure shopping - something that nobody in their right mind should ever do through a public CGI proxy.
ProxyWay - Installation
Anonymous solutions are always somewhat laborious to apply & install, and ProxyWay is no exception. If it were TOO easy, we’d be suspicious anyways. Here’s what you gotta do:
1. Download ProxyWay

2. Run ProxyWay
Run ProxyWay from your Start Button (or the Desktop Icon). It will require an allowance in your Firewall software, so make sure it isn’t blocked. If your firewall blocks it, ProxyWay may appear to be working normally, but it is providing absolutely NO anonymity. The first screen you’ll see will be this:

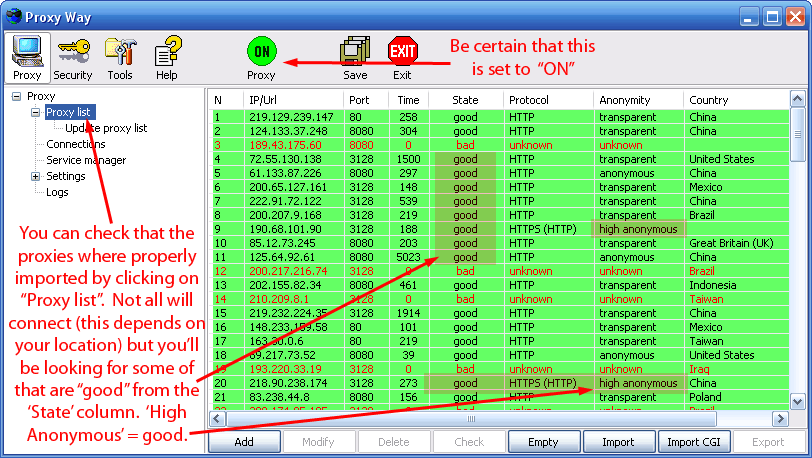
3. Configure ProxyWay
The first thing you’ll need to do is update the proxylist. Click the PROXY icon, then click the plus (+) next to the word “Proxy“, and then click on “Proxy list“, then on “Update proxy list“.


This should now open a new part of the program, now click the “Import” button as shown below.

This will open a new window, where you’ll be need to select the “SiteList.txt” file. Click on it, and select “Open” as shown below:

The ProxyWay main window should have changed (with the imported servers). For now, leave the settings the way they are. You can always come back to this screen and select more proxies to add to the list by putting a checkmark in each one. Now, click “Update” as shown below. (TIP: You’ll need to do an “Update” each time if you add/remove any proxies from the list).

Now, go back to “Proxy list” (as shown below). The list should begin to update, and it will take some time to fully complete (there are 100 proxies that need to be verified - this will take up to 15 minutes). After it has completed, you should see a list of working proxies, represented as “good” from the list.
NOTE: You can also import a 3rd-party list of CGI proxies. Click the “Import CGI” button (see below), and this time direct it to your “CGIList.txt” file - the proxies should automatically begin to update.


Next, go back to the PROXY icon, and select “ProxyWay Auto Configuration“.

This will now open a small window - from the dropdown menu, you’ll be able to select the browser in which you’d like to configure ProxyWay to work with. Highlight your browser, and select “OK“.

You’ll see another window - it mentions that it may take 10-30 minutes. During our test with Explorer as the selected browser, this took about 4 minutes to complete.

After it has completed configuring itself with your browser, you’ll need to close and reopen it (although we recommend that you have it closed during the “ProxyWay Auto Configuration” procedure). For our tests, we continued to have Firefox running, but installed it onto Internet Explorer (which was closed the entire time). Ah, the beauty of having multiple browsers!

CHECK the ProxyWay Service
Restart your browser, and point it to a website. The first thing you should notice that the speeds won’t quite be as fast as they once were, which is normal. To properly verify that the settings took hold, follow these steps:
Internet Explorer
In IE — Go to TOOLS > INTERNET OPTIONS.

Click on the “Connections” tab, then click on “LAN Settings“.

If the software properly configured itself within Explorer, you should see identical settings to what is shown in the screenshot below: This means it is working correctly.

In Firefox
Go to TOOLS > OPTIONS and click on the ADVANCED icon, then select the “Network” tab, then click “Settings“.

The Firefox “Connections Settings” should appear similar to those shown below. NOTE: Your Firefox / ProxyWay installation may list the HTTP Proxy as “127.0.0.1” instead of “localhost” - this is normal.

TEST the ProxyWay Service
To test that the service is running optimally, visit http://whatsmyip.org and see what it says. (It helps if you already know your IP address). If you DON’T know your IP address but are curious to whether this is really working - (IN FIREFOX) go back into your ‘Connection Settings’ and select “Direct Connection to the Internet”. Click “OK” to close the window. Go back to whatsmyip and now see what it says. If it is different from what it was before, then it’s working as it should. (IN EXPLORER) go back to “LAN Settings” and select “Automatically detect settings” (be sure to remove the checkmark from “Use a Proxy server for my LAN”). Click “OK” and click “OK” again. Visit whatsmyip and re-check your IP address.
REMOVING the ProxyWay Service
You can remove the ProxyWay service from one or more browsers by clicking on the PROXY icon, then the “Connections” tab, then click on “Remove ProxyWay settings from all browsers” (see below).

In this screen you can remove the service from one browser, and leave it on another (notice the 5 “browser” tabs in the screenshot above, each can be customized individually). Likewise, you can always just remove the entire software (there’s an “uninstall” link in Start Button > Programs > ProxyWay). In our test, when we uninstalled ProxyWay, it was still left in Explorer as the default proxy. We had to manually go back into the settings and choose “Automatically Detect Settings” to get the browser back to normal.
Archived by FSFmirror
![]()
