March 22, 2010 by sharky
Faster torrents, high connectivity and seed-ability are notably the primary reasons why most of us opt to use a seedbox. Fair enough - but a seedbox (server) can be used to implement a variety of tasks that extend far beyond just torrenting. We’ll explain how you can run a SSH tunnel through your seedbox server, in order to use your seedbox’s IP address as a proxy on your local machine (home PC). And it works for most Internet apps that support SOCKS5 (web browser, IRC/MSN, even a home uTorrent client).
Reasons/scenarios for how this can be applied:
- • As a web proxy — You’ll be able to bypass any IP restrictions & firewalls, unblock certain websites, or torrent from college or work. Because of the nature of SSH tunneling, your traffic is well concealed.
- • Surf Anonymously — Keeps your home IP out of web browsing, since you’ll be surfing the ‘net using the static IP address of your seedbox, not your local IP.
- • Private trackers — If you live in a country that’s banned from receiving invites, or you’re in an IP range that’s banned altogether on certain trackers, you’ll be able to elude this. Plus, you’ll be logging into your private tracker account (in the browser) from the same IP that you’re torrenting from.
- • Torrent locally, but mask your IP — Use your seedbox IP (as localhost) in uTorrent, and although you’re still torrenting on your home PC, only the IP address of your seedbox is reported to the tracker & other peers. Unlike a VPN service which can unexpectedly drop your VPN connection (and default you back to your main ISP, exposing your real IP), this can’t occur when using a manual SOCKS5 proxy.
- • Hide your IP in everything! — Set up a manual proxy configuration in virtually any webapp; including mIRC, AIM/MSN, whatever you want!
What You’ll Need:
1. A seedbox server (VPS, dedi) that comes with shell (SSH) access. You don’t need "root" and it doesn’t have to be a dedicated server or VPS, just so long as you have SSH/shell. Note: Most shared seedbox providers do not include shell access.
2. SSH client, such as PuTTY. Tunnelier is another good option because it supports an auto-reconnect feature for when your proxy connection drops. PuTTY doesn’t have this.
For this demonstration we’ll be using a real server and it’s true IP address, so as to explain how to implement it through PuTTY and various webapps. But first, you’ll need to create a SSH tunnel & login to your seedbox through a shell client:
Create Your SSH Tunnel
1. Download PuTTY, and run it. You’ll be presented with the configuration setup options. Scroll down and open SSH under Connection, and click on the Tunnels tab (see screenshot below).
2. Select the radio button "Dynamic".
3. Enter a port number for the source port, and click "Add".
4. Your new port will appear in the box above (and a "D" will appear before the number).
5. Scroll back up to the top, where it says "Session", click it.

6. In the "Session" option you should create a profile for your new session. Enter your hostname or IP address of the seedbox (server), using Port 22. Enter an arbitrary name for the Saved Session and click "Save". To be certain that the SSH tunnel has been successfully added to this new session, highlight the session name and click "Load". Again, scroll down to SSH > Tunnels and verify that the port has been forwarded properly (ie "D52014" as for our example).

Lastly, click "Open" at the bottom to begin the PuTTY shell session, you’ll see a window similar to below. Using your shell credentials (username / password combo), login to your server. Note: Your password will not be visible when you type it, and copy/pasting your pw will also work.

IMPORTANT! — Do not close PuTTY or kill the session. Leave this window open.
Adding a SOCKS5 Proxy to Firefox
We’ll use Firefox as the example, although most browsers operate in a similar fashion. In Firefox, go to Tools > Options… and click on the Advanced menu icon. Next, click on the Network tab, and hit the Settings… button:

Here, change the radio button over to "Manual proxy configuration". Be sure to select "SOCKS v5" for proxy type, and enter "localhost" for the SOCKS Host. Enter in the port number from above (ie - 52014) - click OK, and OK again.

Head on over to WhatsmyIP.org and check out your new IP address. It should be the same as your seedbox IP - voilà, you’re surfing through your seedbox tunnel.

Tunneling, Adding a Proxy to uTorrent
The same procedure can be done through a BitTorrent client such as uTorrent. This is a great tip to bypass firewalls in your office, college or anywhere else that doesn’t appreciate torrents, for that matter.
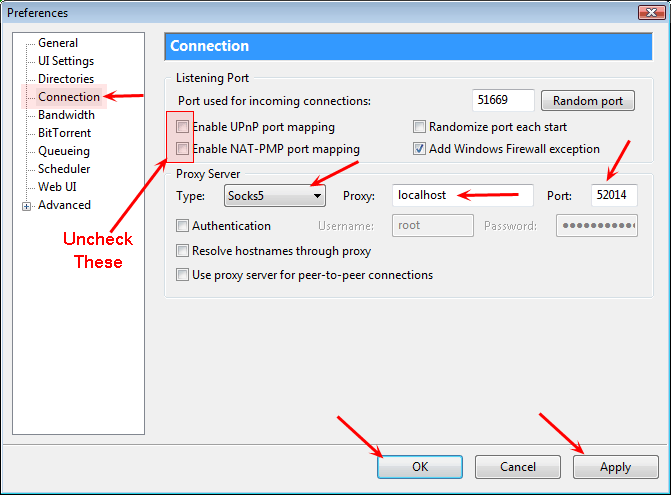
In uTorrent, go to Options > Preferences and click on the Connection tab. Choose SOCKS5 from the dropdown in Proxy Server Type. Enter "localhost" for the proxy, and enter in your port number (ie - 52014). Also, disable (uncheck) UPnP & NAT-PMP port mapping - and while you’re at it, click on the BitTorrent tab and disable DHT, Local Peer Discovery and Peer Exchange (these can all leak your real IP address). Click Apply and OK to finish.
To test this out, head on down to CheckMyTorrentIP.com and download a torrent & open it into uTorrent. This new torrent should detect your seedbox IP, which in our case is 217.114.222.95.

Back on CheckMyTorrentIP.com, the "Check IP" tab will show both your torrent IP and browser IP addresses - and since we’ve configured both the BT client and the browser to use our tunnel, they’re obviously the same IPs (of our seedbox).

NOTE: This likely won’t raise any red flags on your private trackers, since this is the same principle as using a seedbox directly anyways. However, we don’t advise you to log into your private tracker accounts (or download .torrents) while using your seedbox proxy in the web browser, as this might be perceived that you’re sharing the account. If in doubt, always ask tracker staff first - explain that you’ll be logging in through the seedbox; they won’t have a problem with this as long as they know in advance.
Proxy for mIRC
Sure, there are better ways to set this up natively through IRSSI and have it connect to certain networks & channels, which also allows you to connect locally on a Windows machine. But for this tut, we’ll just do it through mIRC directly.
First of all, disconnect from all active networks. In mIRC, go to Tools > Options… and click on the Firewall tab (under Connect). Change the Firewall Support to "Both" & change the Protocol to "Socks5". Enter in localhost for the Hostname, as well as the port number - click OK to save the changes.

(Re)connect to a network. Do a WHOIS check on yourself, it will now report your seedbox IP address instead of your home one.
Happy tunneling!
Archived by FSFmirror
![]()
