May 28, 2008 by sharky

• An XBOX 360
• Windows XP MCE (Media Center Edition) or Windows Vista with Media Center.
• PC Software:
- 1. MCE Browser — A plugin for Microsoft Windows Media Center which allows you surf the Internet using a Media Center remote control.
- 2. AutoUnpack — A freeware utility to download and extract compressed files, similar to WinRAR or 7-Zip. The main difference is that AutoUnpack can be set up to monitor a specified folder every couple of minutes for new archives and automatically unpack them to a set folder.
- 3. µTorrent
*** Step 1 - Connect Your XBOX to the PC in Media Center ***
You’ll need to correctly configure your XBOX to connect to your PC. You may have already done this, especially if you’ve set up an ‘XBOX Live’ account through your PC’s Internet connection. If not, it’s relatively straight-forward - refer to your XBOX documentation or view this page. During the configuration, an image should appear similar to this:

*** Step 2 - Download and Install: ***
2.1 — Download and install µTorrent on your PC. Minimize it, we’ll come back to this.
2.2 — Download and install MCE Browser on your PC. The current file is "MCEBrowserSetup_v22.msi".
*** Step 3 - Configuring Media Center on the PC ***
Before we add a private tracker to Media Center, we’ll first need to configure it to work with your Internet connection. If you already use Media Center, skip to Step 4. Launch your ‘Media Center‘ program on WinXP or Vista through your START button. Shown below is a look at the ‘classic’ view of XP:

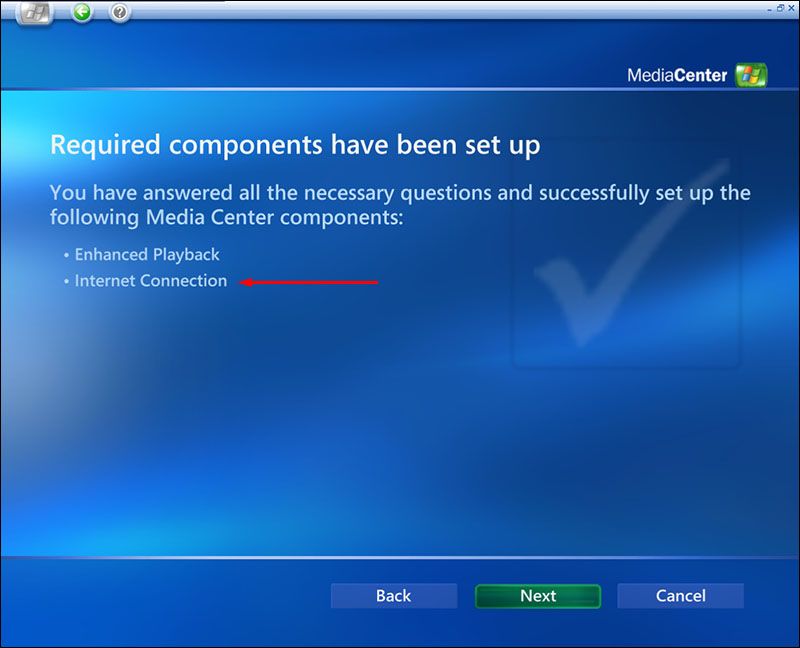
By default, Media Center launches in full-screen mode - feel free to double-click in the top bar to exit this mode. If this is the first time running Media Center, follow the on-screen procedures to properly configure it. At the end, you should get a message ‘Required Components Have Been Set Up’ - be sure that "Internet Connection" is listed (see image - below).
*** Step 4 - Add a Private Tracker (Website) to Media Center ***
This procedure is slightly more complicated than regular Internet browsing with MC, for the reason that we need to be logged in to the tracker. If you already know how to add your Explorer Favorites to MC, then some of these procedures can be skipped. Media Center will automatically import your Favorites list from Internet Explorer; however, Firefox users will need to follow these steps.
4.1 — Go to More Programs > Browser:

NOTE: If this is the first time you’ve run Media Center, it may appear like this:

4.2 — The next screen will appear as shown below. Click "Enter URL":

4.3 — Now enter in the URL of your private tracker. For this example, I’ve used FunFile.org.

4.4 — Next, click "Browse to URL".

NOTE: You may get a ’script error’ - click YES to continue loading the script:

4.5 — You’ll need to login to your private tracker in Media Center. (You may want to enlarge the MC window). After logging in, click the "Add to Fav." button. Click "OK" to confirm:

Click the "Location" button to go back (or click the green "back" arrow):

You should now see your tracker listed in the Favorites:

TIP: Although I’m not a user of Explorer, I found it much easier to login to my trackers in IE and add them to my Favorites there, instead of manually typing in each URL for my private trackers in MC. Media Center will import the updated Favorites list on-the-fly (although you likely need to restart MC to reflect the changes).
Feel free to add as many trackers as you like. The Media Center screen (above) is exactly what you’ll see in your XBOX 360.
*** Step 5 - Add a Torrent from Media Center in Your XBOX***
This step is important because we need to find out what directory the torrents are being saved to - I couldn’t figure out a way to change this in XBOX. For this step, it is assumed that your 360 is properly hooked up to your PC.
5.1 — In your XBOX, go to the MEDIA tab, and click on Media Center. You can also just click the "Media Center" button on the remote control, if you like.

In Media Center, click on "More Programs", then click on "MCE Browser". Open one of your links (i.e. FunFile) that you added in Step 4.
5.2 — Browse to a torrent file, and download it - but do not open it - click "Save" instead. Make a note of the save path of the torrent file - write it down. The reason is because we need to know what folder the torrents are being saved to for µTorrent in Step 6.

"C:\Documents and Settings\<Your Computer User Name>\My Documents".
*** Step 6 - Configure uTorrent ***
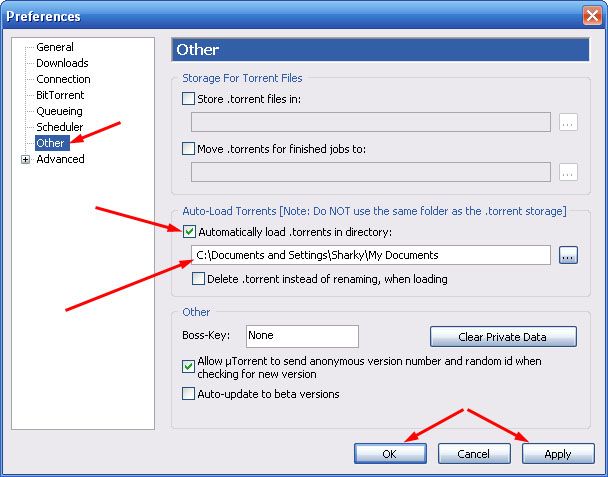
On your computer, launch µTorrent, and go to Options > Preferences - and click on the left tab that says "Other". Now, put a check in the box that says "Automatically load .torrents in directory:".
Add in the path from Step 5, as shown below. Be sure to click APPLY and OK to save the changes.
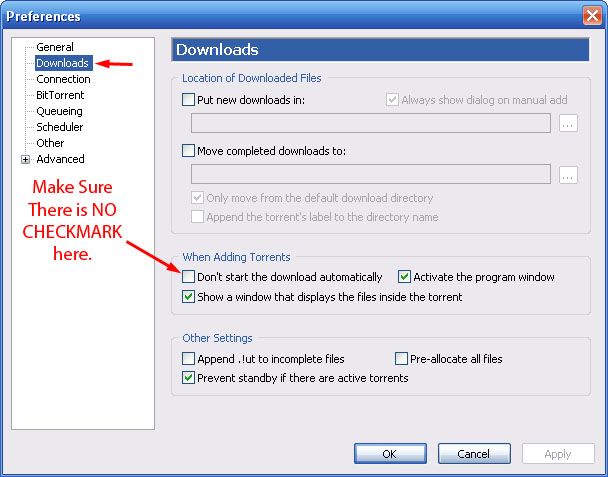
While in Preferences, be sure that torrent jobs are automatically started when downloaded into µTorrent. Go to the "Downloads" options tab, and make sure there’s no checkmark in the box that says "Don’t start the download automatically" - see below:
Congrats! You are now able to download torrents (and start jobs) in µTorrent on your PC from your XBOX 360. But we’re not done yet - you’ll need to automatically unpack the RAR files…
*** Step 7 - Configure AutoUnpack ***
Here we’ll use AutoUnpack to automatically extract RAR files so that we can stream the video (or anything else, really) from your PC to XBOX.
7.1 — Download AutoUnpack from here, and install. You may need to install some additional MS C++ runtime files (they’re included with the package). Run AutoUnpack after installation.
7.2 — You’ll need to supply both folder locations for "Archive Folder (source)" and "Archive Folder (destination)" - use the same folder for both paths - it must be the same one that you added to µTorrent in Step 5. The default is:
"C:\Documents and Settings\<Your Computer User Name>\My Documents".

You’ll need to manually "browse" to this folder, as shown below - click on each folder to open, or click the ( + ) sign. After browsing to the proper folder, click OK to select. Repeat for both source and destination paths.

Be sure to click "Start" in AutoUnpack to begin the folder scanning & unpacking process.

AutoUnpack is great because it scans and unpacks all subdirectories, as well.
That’s it! Browse your private torrent sites, download torrents, and control everything from the comfort of your La-Z-Boy. The *.avi files (or anything else) will be extracted to your saved directory, where you’ll now be able to use your XBOX 360 to browse to the media files.
Archived by FSFmirror
![]()
