February 22, 2008 by sharky
« Part I of a 3-Part Tutorial [2] [3] »
Do you think you got what it takes to become the next mininova?
Do you ever wish there was a button you could push to delete all the crappy torrents at those popular BitTorrent sites? Ever wonder what it’d be like to run your own BitTorrent site? It’s a blast! And the best part - Total control! You get to add only the torrents that you want, without all the junk found on the public BitTorrent juggernauts.
There’s one thing that ALL BitTorrent websites have in common: they started out small. Here we document the entire process for setting up your own BitTorrent website - with your own trackers, as well. We’ll give you fair warning - this takes some work!
About this tip:
A few things we must first mention:

— There’s always a catch to free services - if too much monthly bandwidth is used, they can easily just remove your site. With a paid service, you just upgrade your account.
— If you draw complaints, they’ll take your site down without any notice. Many premium webhosting companies will have no issues with you running torrents on it.
— You won’t get any support from a free service. Many paid webhosting companies have “live” support at their website or at least a phone number you can call.
— To subsidize your webhosting costs, just throw on some ads from Google Adsense or some other ad hosting company. You’ll likely make more than what you’re paying, anyways - get people you know to click them!
Getting Started. (Pre-installation / pre-requisites)
Sign Up for a Webhosting Service & a Domain
First, you need to have a piece of real-estate set aside for you on the Internet. You can either set up a ‘domain’ first (from a domain registrar), and get your webhosting after - or you can do it all from the same webhosting company. We highly recommend that you to get your domain name from the same place that’ll be hosting your site. This is so if you make changes to your webhosting account, you won’t have to contact your domain registrar with the new nameservers (this will all be done internally) and it can save many headaches down the road. All major webhosting sites allow you to do both the domain name registration and web hosting at the same time.
IMPORTANT: You’ll need webhosting that supports PHP 4/5, MySQL 4/5+ and cPanel (hosted through a Linux/Unix server). So stick with a well-known company. When selecting a webhosting plan, you’ll first have to explore what you’ll be using your site for. If you plan on just using torrents that already exist on public sites like mininova.org (and add them to your site), you’ll be able to get away with using a cheap webhosting plan. But if you wish to use your own tracker to host your own torrents, you’ll need to have a dedicated-server account. See Part III of this tutorial for more details.
When setting up a domain, we also recommend that you subscribe to the “privacy” service or ‘private registration’ that’s offered by most companies - it costs around 20 bucks extra, even less - but well worth it. This will keep you out of the whois registry.
So go ahead and sign up somewhere for a hosting account and pick a domain name.
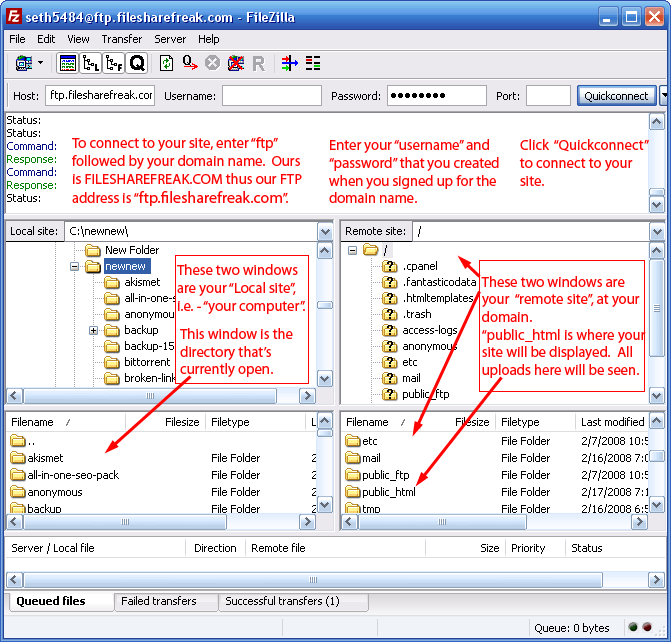
Connecting with FTP
Learn HTML
Knowledge of HTML is hugely beneficial to setting up a BitTorrent website, especially since you’ll probably want customize it your way. If you have NO experience at all in PHP or HTML, your torrent site is going to look a bit generic, but it will work nicely. The BitTorrent frontend templates that we detail require no knowledge of web programming, and are simple enough that just about anyone will be able to set up their own BitTorrent website. The web is abundant with excellent HTML tutorials, and it’s not that difficult to learn - www.w3schools.com is a good starting point. Already afluent in HTML? Great! The rest of the tutorial should go quite smoothly. And if you already have a wordpress website (not a wordpress.com blog, but the wordpress.org self-hosted type, then this should be a breeze!).
cPanel

Part I - Configure your domain for PHP, MySQL and Torrent Files.
There’s quite a lot to cover before you’ll be able to set up a torrent website. If you already have a website set up and working, particularly with wordpress, then some of these steps are likely already done. Although we’ve tried to simplify this as much as possible, setting up a BitTorrent site from the ground up is no small task. These procedures cover the basics for anyone who is starting out from scratch, with no website at all (just the domain) but we also . Jump ahead to wherever you see fit. (Tip: If you do indeed have a site based on a Wordpress template, simply add torrent files to your Apache handler and proceed from there).
It is assumed that you’ve created a domain name and signed up for webhosting that supports PHP 4/5 (5 recommended), MySQL 4 (5 recommended) and has cPanel. You should now be able to connect to your “site” though FTP, even if you don’t have a website ‘there’.
You’ll need to configure your server through the cPanel in order to set up your site to use PHP scripting (with a MySQL backend database server). Sounds complicated? Not really. Follow these steps.
Test that your domain is ‘Up’ / cPanel
Visit your site (URL) through a web browser. Whether you actually have a website “UP” or not is not important. What’s pertinent is that you can connect to it through FTP, and that your website’s URL does load in the browser. If you created a domain, say for example, www.torrentnerds.com, then type in http://www.torrentnerds.com in the browser URL window. What you DON’T want to see is this message below, because it may mean your site is not yet ready or not working.

If your “site” loaded without any errors, you’ll be able to access your cPanel. So type in /cpanel after your URL (i.e. www.torrentnerds.com/cpanel ). You should now see a window similar to this one below: (Note - the cPanel window varies from one service plan to the next, but the general features are the same).

Set up your domain (server) to use PHP (in cPanel)


If .php, .php3 and .php4 were NOT listed in the “System Defined Handlers” and you had to add them yourself, you should now see them listed underneath your “User Defined Handlers“. If done correctly, it will appear something like this:

Adding a MySQL Database (in cPanel)
A BitTorrent site is more complicated than it appears, and there are a lot of behind-the-scene processes going on. One thing that needs to be incorporated is a way to handle all of it. Through the cPanel, you’ll need to add a MySQL database to your service. Look for the “MySQL® Databases” icon - it will appear like this:

If you’re starting out from scratch, you’ll probably just see an empty-ish looking page:

Or, it may resemble this page:

Either way, you’ll need to:
1. Add a Database:
Very simple: just enter a name for the database, and click “Create Database” or “add DB” or similar. Note that it will add your username to the beginning of the database name - this is normal. This username is the same one that you used to create the webhosting account. After adding the database, you should now see something similar to one of these:


2. Add a User:
Also simple: just enter a name for the new user, and enter a password - click “Create User” or “Add User” or similar. It will also add your username to the beginning of the added “user”. Also be sure to enter a password, and remember it. You’ll see the new name added, similar to one of these:


(NOTE: For the shown examples, we used the name “sharky” for both the name of the database and the name of the user.)
3. Connect the User to the Database:
This is the most crucial step of all. Now that both the user and the database have been created, they must be connected. Look for a box that says “Add User to DB”, and click it.

Depending on your version of cPanel, it may also look like this (see below). Near the middle of the window, you’ll see a heading that says “Add Users to Your Databases“. You’ll be able to toggle the dropdowns to select the users and databases (in case you have multiples of both). Click the ‘Add User to Database’ button:

Adding *.torrent files to your Apache
You need to associate torrent files with your server. This is simple. Go back to the “Apache Handlers” in cPanel, and this time you’ll need to add the extension “torrent” to the list, as shown below:


We’re DONE configuring! Now your ready to upload the BitTorrent template to your domain.
PART II - BitTorrent ‘GUI’ Frontends - Upload your BitTorrent Template »
Archived by FSFmirror
![]()
