February 19, 2008 by sharky
« Part II of a 3-Part Tutorial »
The frontend is a (PHP) BitTorrent theme, or template, that includes the visual aspect of the BitTorrent website. A typical “frontend package” will consist of two things: A GUI for the website and a tracker. The GUI of a frontend will house the user-interface and “Control Panel” through which the general settings can be modified, as well as the configuration of the site’s tracker. The tracker is a server between all of the peers, and coordinates the “who-gets-what” when distributing the data in a torrent. By default, the tracker in a typical frontend package will be a private one - whereby anyone using the torrent must be a registered user of the site, and thus registered with the tracker.
The backend is what runs the BitTorrent tracker. Many older frontends rely on an external tracker (software) to be installed and configured separately, and this approach is not for the novice user. Most newer BitTorrent frontend packages come with a backend (aka.. ‘tracker’) already incorporated into the template, making it possible for almost anyone to run their own BitTorrent website.
The ‘Frontend’ - a BitTorrent template for your domain
We detail the installation for three newer (PHP) BitTorrent frontends - BtiTracker, FTS and xBtit. Each of these three examples comes pre-configured with their own backend (tracker), and are implemented through an easy, web-based “installation”. NOTE: For the more experienced users who’d like more examples of frontends, we’ve uploaded an entire “BitTorrent frontend / tracker” release-package to rapidshare.com - it comes with these and many more (older) BitTorrent frontends, backends and trackers. Download it here. If this rapidshare link dies, let us know and we’ll re-upload it.
‘Frontend’ BitTorrent Installation
Before we explain a specific frontend installation, we’d like to point out that there are three scenarios in which it can be applied (well, there’s many more than three but these are the ones we’ll be discussing):
1. You have no website installed on your domain. (i.e. a New domain).
1. No website (a “clean install”)
If you just set up a new domain and do not have an existing website, but you’ve already configured your PHP and MySQL settings in Part I of this tutorial, then the installation is straight-forward - skip to here.
2. Existing Website (i.e. ‘HTML’ site)
You may or may not already had a MySQL database set up for your domain (besides the one we instructed you to install). Regular ‘HTML’ sites likely won’t already have this done, so you’ll only need to add the one MySQL database as explained in Part I. If there was already an existing database there, follow the instructions for adding a second MySQL database here (but don’t forget to add a subdomain - read below).
If you already had a website up and running before you decided to add a BitTorrent frontend, you’ll be able to add a BitTorrent frontend without affecting your existing site (and without having to set up a whole new domain). To do this, you’ll need to add a subdomain to your existing webhosting account, and run this secondary BitTorrent site from that subdomain (recommended). If you try to just install (upload) the Bit frontend to the root of your domain (i.e.


To access your new subdomain via FTP, a new directory called “tracker” should have been created in your /public_html/ directory. Using FileZilla (or any other FTP program) will verify that the new directory has been created. This /tracker directory is now the site root for the subdomain ‘tracker’ that was added. Anything uploaded to this directory will been seen in a web browser (similar to a whole new website) when, for the example above, http://tracker.filesharefreak.com is entered in the URL window.
3. Existing “PHP/WordPress” Website
You’ll need to do the above “subdomain” trick as well, in order to avoid conflicts.
If your website is a WordPress site (or other PHP-backend site), this means you already have PHP installed and a MySQL database - we strongly recommend that you create a second MySQL database (in any event you’ll likely have to anyways, but we advise this just in case). This will allow you to upload the frontend template to your subdomain, and you won’t have any WordPress/BitTorrent database conflicts. This second MySQL database will be the one to use for the new BitTorrent frontend - don’t forget to add a user to it (or link to the existing user) and add that user to the new database! Use the same procedures from Part I, here’s what cPanel / MySQL should look like with two MySQL databases:

BitTorrent ‘Frontend’ Examples
At last! The pot o’ gold at the end of the BitTorrent rainbow!
These frontends are very recent and are still being actively developed, which is why we’ve chosen them as our models for inclusion. We feel it serves no purpose to document any frontends that ceased development in 2004, when there are many excellent, newer alternatives. Additionally, these BitTorrent frontends not only look sharp and come pre-loaded with a whack of features, but they also contain their own backend trackers which makes them complete, all-in-one packages. We installed and tested:
- — FTS v1.0.0
- — BtiTracker v1.4.7
- — xbtit v2.0.496

FTS (Free Torrent Source) - BitTorrent Frontend & Tracker
Why we like it: Anyone who’s serious about setting up a private BitTorrent site should use FTS.
Why we don’t: We were unable to add external torrents to the site, nor could be find any settings that we could change to allow this. If you don’t care about using torrents from mininova, thepiratebay etc, then use FTS. If you’d like to add torrents from other sites, use a different frontend, such as xBtit.
FTS Installation:
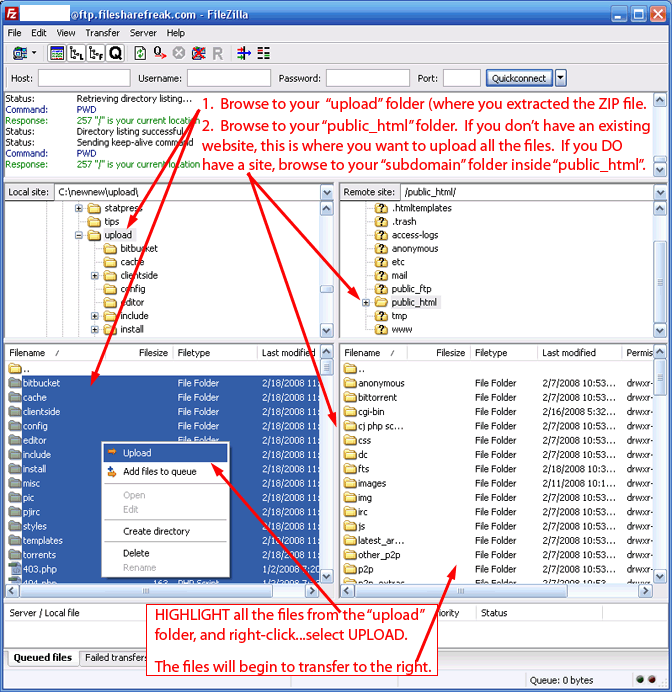
Download FTS from here. Open the *.RAR file (called FTS_1.0.0.rar) and extract to a temporary directory. The folder inside the .rar is called “upload”. Connect to your site through FileZilla (or other FTP manager). Here’s where it’s tricky: If you don’t have an existing website at your domain, you should upload all the contents of the directory “upload” into your /public_html/ directory. If you DO have an existing site, you’ll want to browse to your created subdomain folder inside /public_html/ and upload the files there. You don’t want to upload the actual “upload” folder, just the contents inside it.
The transfer of the files should take around 5 minutes. Relax, crack open a beer, light a cigarette. Now, after they’ve finished, you’ll need to make some read-write changes to some of those folders that you uploaded. THIS IS VERY IMPORTANT. There’s 4 folders that you’ll need to modify to CHMOD 777 (this means they’ll have all read-write access). The 4 folders are:
- — bitbucket
- — cache
- — config
- — torrents
To do this, browse to those folders in FileZilla and highlight them, right-click with the mouse and select “FILE ATTRIBUTES…” (see below)

The “File Attributes” window should pop open, like below. You need to enter the numbers 777 for those 4 folders.

After changing those 4 folders, you’ll be able to access the web-based installation portion of the setup. Launch Firefox, and type in your homepage address, followed by /install. If you don’t have an existing website already (and you uploaded the files to your /public_html/ folder, then type in, say for example, this:
— http://filesharefreak.com/install
If you’re installing to your subdomain’s directory, then enter your site’s home URL, followed by your subdomain, and then /install (as shown below):
— http://fts.filesharefreak.com/install
If the BitTorrent Gods are smiling down upon you, this will now launch the web-based portion of the setup - which consists of 8 steps. We don’t document the entire procedure, but here are the main things that you should pay attention to:
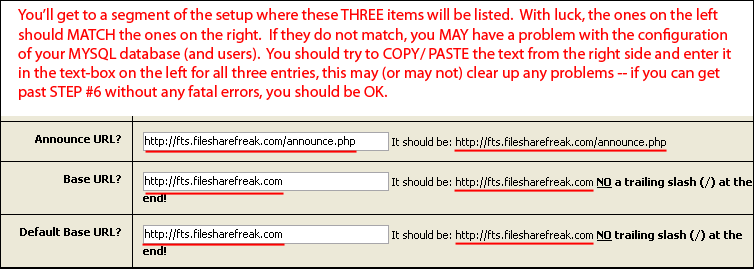
You’ll be notified in the first page of the SETUP to modify those 4 folders (i.e. the ‘777′ change). Ignore this, as you’ve already done it. BELOW: There’s three lines in one of the setup steps where your URLs must be configured - FTS may or may not properly display your directory paths, and they’ll need to be changed to the proper ones. See screenshot below.
If you did everything correctly, you’ll see this message in Step 6. Click on “Start Import” to import the FTS database to your server. NOTE that almost ALL of these settings during installation are changeable.

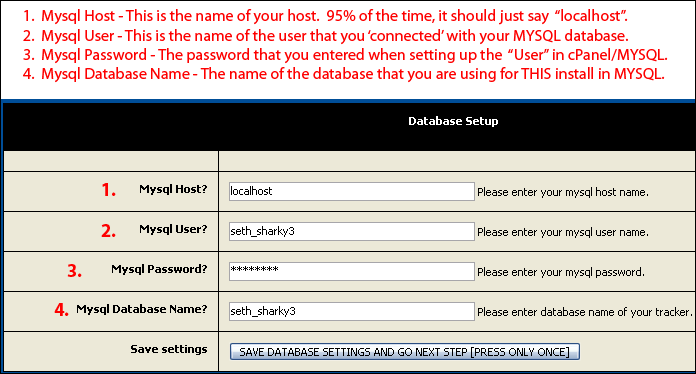
— A “user” has not been configured (added) to the database in cPanel / MySQL.
— The “user” and “database” in the first screenshot above do not match the actual user and database name as stipulated in cPanel / MySQL. (If you have more than one database, be sure you’re selecting the correct one with the proper user and password).
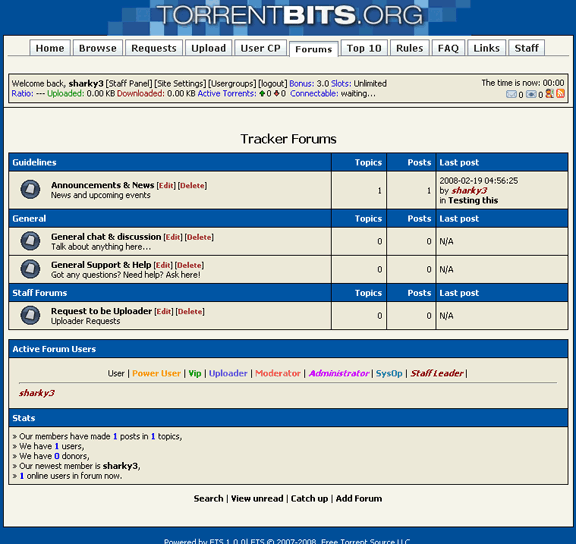
You should now be able to access your BitTorrent site through your URL in the browser, if the setup didn’t automatically launch to it. You’ll likely have to LOGIN to your site if you left it to the default settings during FTS installation. Your BitTorrent site should appear like this:
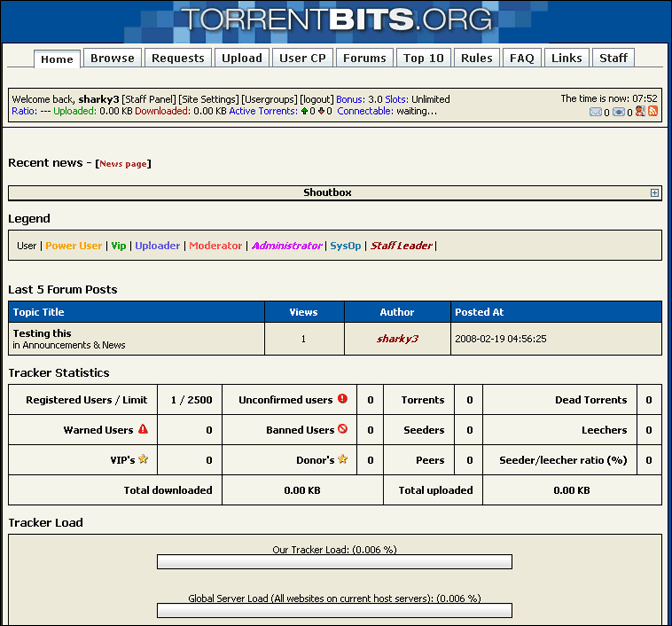
BtiTracker 1.4.7 - BitTorrent Frontend & Tracker
BtiTracker is good BitTorrent frontend from BtiTeam. This one is used everywhere by aspiring BitTorrent site operators. See a DEMO of it here. Be sure to check out their WIKI - it offers all sorts of help and information about BtiTracker.
Why we like it: With BtiTracker, you’ll be able to add external torrent files (from mininova, isohunt) and host them through your site without using your tracker. This is great if you want to keep a small webhosting account and use torrents from the big public sites. (But it DOES come with its own backend tracker in case you want to go that route, too!). Also has a ‘theme-changer’ dropdown for quick visual manipulation.
Why we don’t: It doesn’t come with a pre-packaged forum, so you’ll need to find and upload your own (if you want one), and hook it in through the settings.
BtiTracker Installation:
The installation procedures are basically the same as for FTS or any other PHP/MySQL package - you’ll need to create a new MySQL database with a connected user.
1. DOWNLOAD BtiTracker 1.4.7 from here. The current file is called btitracker_147.zip. Unzip to a temporary directory - this will create a folder called btit147. There is also a “Readme.txt” (install) file in the ZIP that stipulates the same setup procedures as below, in case you want a second opinion.
2. UPLOAD THE FILES from btit147 to your domain with an FTP program. Again, if you have an existing website on your domain, you’ll need to add a subdomain, and upload your files there. If you DO NOT have an existing website set up on your domain, you can upload the files to /public_html/. Remember, you don’t want to just upload the btit147 folder, you want to upload just the files in that folder to your domain or subdomain.
3. AFTER THE FILES ARE UPLOADED, you’ll need to do a CHMOD ‘777′ alteration to some of them, so that they have full read/write capabilities. The ones that you want to modify as 777 are:
- — “torrents” folder
- — addons/guest.dat (not the entire “addons” folder, just the guest.dat file inside it.)
- — include/config.php (same as above, just the config.php file should be ‘777′).
- — chat.php
- — badwords.txt
4. LAUNCH YOUR WEBSITE in the browser. For example, if you have NO website, just enter your home URL (i.e. http://filesharefreak.com). If you installed a subdomain and uploaded the files to that directory, then browse to your subdomain’s root directory (i.e. http://btit.filesharefreak.com). This should automatically launch the setup of BtiTracker, and you’ll see a page with this message:


xBtit v2.0.496 - BitTorrent Frontend & Tracker
xBtit is another great BitTorrent frontend from BtiTeam. To get the latest version of xBtit, you’ll first need to register with them - they’ll send you a confirmation email immediately - then you’ll be able to access the downloads area of the site. Finding it is a little tricky: after logging in your account, click on the Downloads button in the top menu, then click “Trackers BitTorrent” and click on [CURRENT xbtit v2.0.496]. Look for the download button at the bottom.


• XBtiT (and other tracker source codes) can also be found on BVList.com.
Why we like it: A huge list of features including internal forums, its own PHP backend tracker and the ability to add external torrents.
Why we don’t: Not much to complain about! This baby is cold as ice!
xBtit Installation:
The installation procedures are basically the same as for FTS, BtiT or any other PHP BitTorrent frontend. Again, you’ll need to create a new MySQL database with a connected user.
1. Download, and unzip or unrar - this will create a folder named “xbtit 2.0.496″. Use an FTP program to upload all of the files in that folder (not the folder itself) to either your webroot (if you don’t already have a site set up on your domain) or upload the files to your subdomain directory.
2. Point your browser to either your site (home) URL, or your subdomain URL. This will launch the web-based SETUP portion of the installation, you should see this screen:

3. Now, go back to your FTP program - you’ll FIRST need to CHMOD 777 a few items that you uploaded. They are:
4. Go back to your browser, and click START to commence the installation. The requirement check will begin - you’ll want to have all green: Click NEXT.

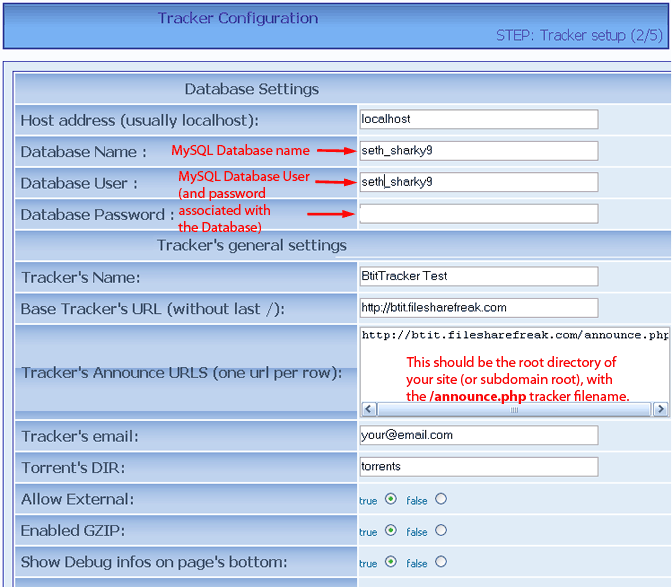
5. In STEP 2/5, enter in your database user (the one that’s associated with the MySQL database), the password, and the database name. For the “Table Prefix” enter your database name, followed by the underscore ( _ ) key:

5. In STEP 3/5, your database.sql will be imported. Click NEXT. In STEP 4/5, you can enter your desired sitename, plus some other customization. Be sure that your site root (or domain root) is properly listed in the “Site-URL” textbox. Leave the “Forum Type” as xbtit Internal Forum, unless you really know what you’re doing. In STEP 5/5, enter in a desired username and password. You’ll need those to login to your site. Click NEXT and login.
6. There will be a security warning. While INSTALL.PHP has been properly deleted (you can check for it, but it’s gone), UPGRADE.PHP has not. Go back to your site root in the FTP program and delete “upgrade.php”. Refresh your site in the browser - the error message will disappear.
7. Set up your tracker. Click the “Admin Panel” link near the top. On the left you’ll notice the Admin Menu - under Tracker’s Settings click the ‘Tracker’s Settings’ link. There’s two things you need to modify to get your tracker working, see below:

That’s it! All done. Browse your site, browse the settings. You can add .torrents through the UPLOAD menu at the top. Change your theme by clicking the STYLE dropdown box inside the User Info sidebar on the right. You’ll also have to set up your FORUMS. Go into your ADMIN MENU and click on “Forum’s Settings” and create a new forum.
Be sure to check out the xBtit forums, as well.
MYSQL Troubleshooting:
With any frontend installation, you can verify if the install was successful through a feature in cPanel called phpMyAdmin, which can either be found as its own ICON in cPanel, or else there’ll be a link to it in MySQL, near the bottom of the page. In our version of cPanel, there is no icon, just the link (see below).


« PREVIOUS (Part I - Configuration) - NEXT - (Part III - Backends) »
Archived by FSFmirror
![]()
