courtesy of tensteel.
This is updated EAC to FLAC tutorial.
EAC & FLAC Setup
1. First, you need to download and install both EAC and FLAC.
According to the download page, the new version includes FLAC packaged with the EAC install files. Just in case, I’ll include the link for the FLAC frontend download as well.
EAC: http://www.exactaudiocopy.de/en/
FLAC: http://sourceforge.net/project/downloading.php?groupname=flac

Once you download and install EAC and run it for the first time you will see this setup wizard screen:
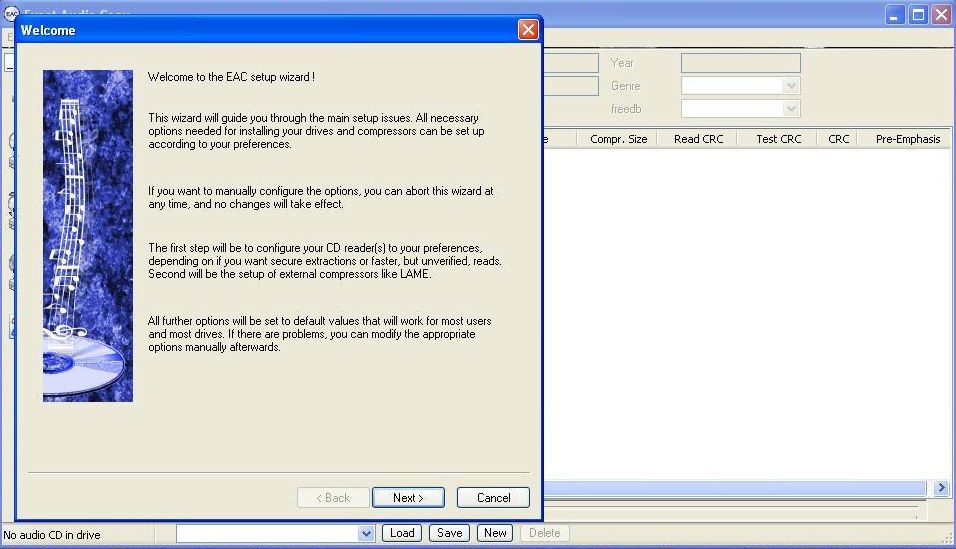
Hit Cancel to get out of this wizard. You won’t be using it because we’re doing a very specific setup that may not be covered in the wizard.
Also, make sure that the FLAC frontend is installed as well. Put the FLAC files wherever you want, just be able to find them later.
2. Hit F12 to go to the FreeDB Options.
Enter an email address here (see below). Hit OK to exit out of the FreeDB Options. This is needed to access the freedb database. Hit "OK" to exit this window.

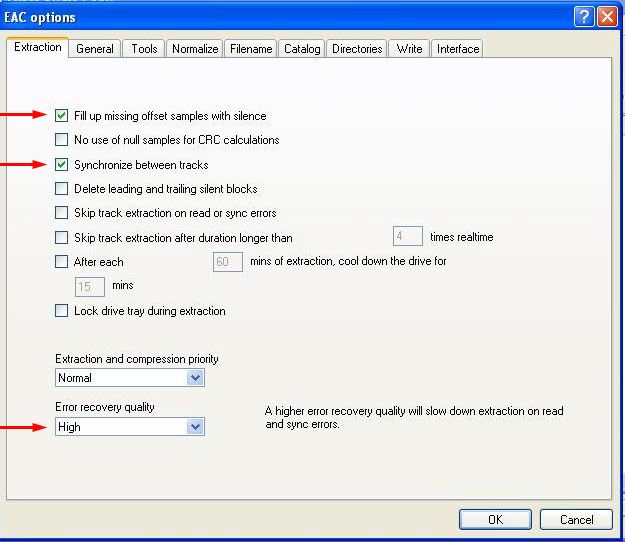
3. Hit F9 to bring up the EAC Options.
Under the first tab, Extraction:
- — Check Fill Up Missing Offset Samples With Silence.
- — Check Synchronize Between Tracks are all that need checking here.
- — Turn Error Recovery Quality to High.
4. Hit the General Tab.
- — Check "On Unknown CDs" and "Automatically Access Online FreeDB Database".
- — Check "Wait for external compressors".
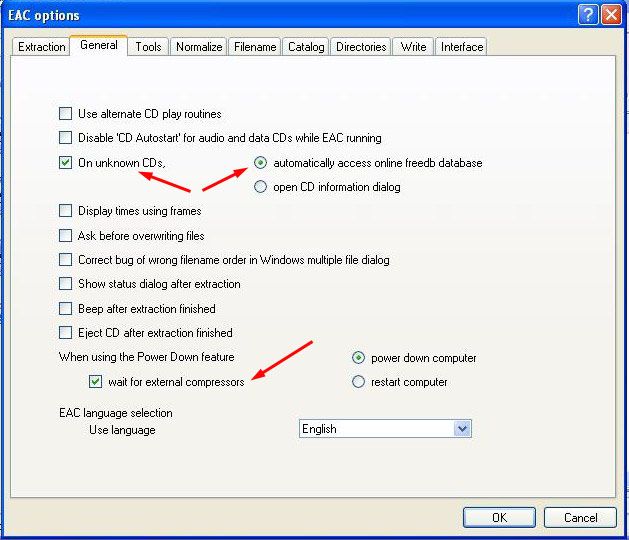
NOTE: These above options for the most part have no effect on accurate ripping. Options such as Disable ‘CD Autostart’ For Audio And Data CDs While EAC Running might give you more luck ripping copy protected CDs, but that can be done outside of EAC by holding down SHIFT before and while you insert the CD until it loads as well.
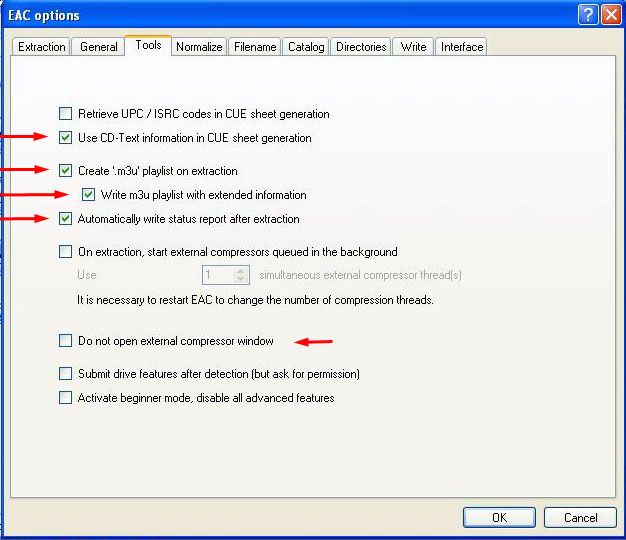
5. Hit the Tools Tab.
Check:
- — Use CD-Text Information In CUE Sheet Generation.
- — Create ‘.m3u’ Playlist On Extraction and Write m3u Playlist With Extended Information below it.
- — Automatically Write Status Report After Extraction.
You can also check ‘Do Not Open External Compressor Window’ if you do not want to see one. Checking Retrieve UPC/ISRC codes is optional, but overall unnecessary.
6. Hit the Normalize Tab.
Do not check anything under this tab. Normalizing files destroys any efforts to make them lossless!

7. Hit the Filename Tab.
You can set this up pretty much however you want it, the symbols here should be self-explanatory. I prefer this method: %D\%C\%N - %T to automatically place it in an Artist/Album folder. Example: /Stone Temple Pilots/Purple/01 - Meat Plow.wav.
7b. Under the Directories tab, select whatever folder you’d like to save your files into.
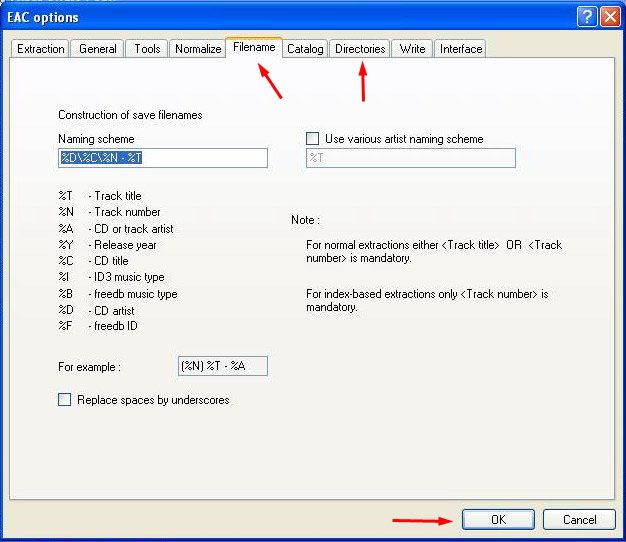
Once you are done, hit OK to exit out of the EAC Options.
8. Hit F10 to bring up Drive Options.
A warning box may popup. Uncheck the box, and just hit OK here so it won’t come back.
Extraction Method Tab:
- — Select ‘Secure mode’.
- — Check ‘Drive Has Accurate Stream’ Feature.
- — Check ‘Drive Caches Audio Data’.
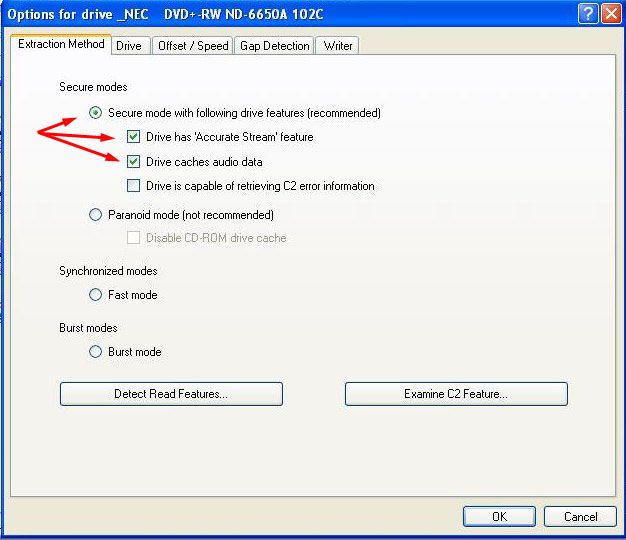
NOTES:
— If your drive or drives do not show up, you may need to close EAC, and make sure you placed wnaspi32.dll into your EAC directory…
— Not all drives support the Accurate Stream feature. To see what features your drive has click the Detect Read Features button.
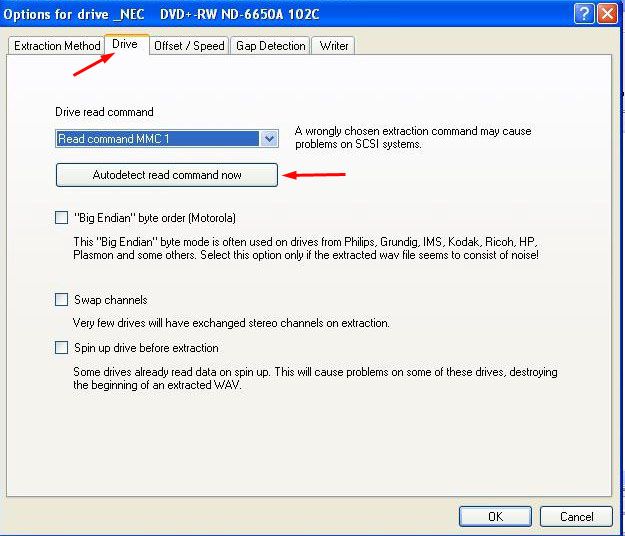
9. Hit the Drive Tab.
Make sure you have an audio CD in the drive, then hit the button for Autodetect Read Command Now. Whatever read command it finds, use that.
10. Hit the Offset/Speed Tab.
With an audio CD in the drive, click "Detect sample offset correction." Once AccurateRip recognizes your CD as a valid "Key Disc," it will test your drive and determine the offset. Sometimes, if your drive is not in the active database, you may have to do a series of 3 tests with 3 different discs.
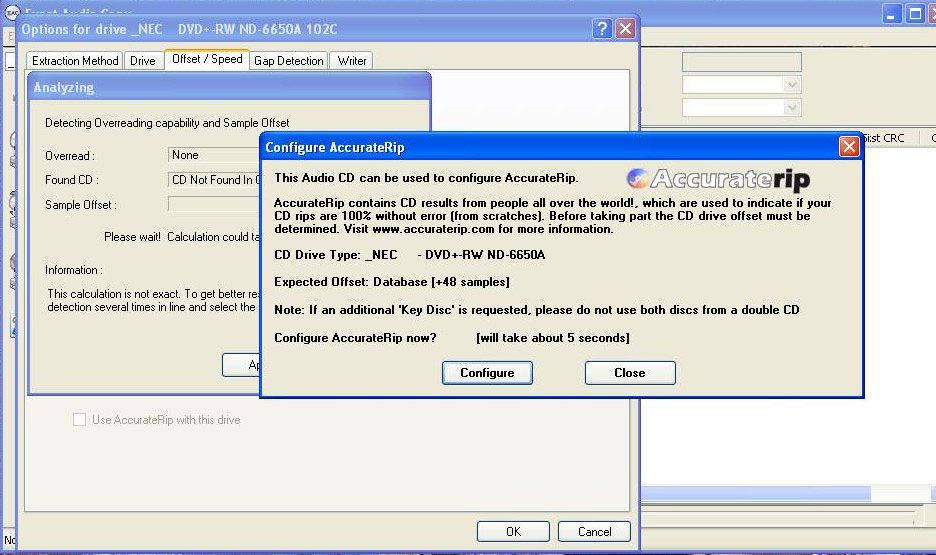
Once your drive offset is determined, the window should look something like this:

11. Hit the Gap Detection Tab.
- — Select either Detection method A, B, or C.
- — Select Secure for Detection accuracy.
NOTE: Detection method A usually works fine and the other methods usually work just as well but on the odd chance your drive can’t read gaps on CDs, try methods B or C. Different methods work with different drives. In general, Method A is the fastest and Method C is the slowest.

Hit OK to exit this window.
12. Now hit F11 to bring up Compression Options.
Note: You can skip this step if you are planning on only ripping to WAV and compressing to a different format. However, remember that FLAC is the most widely accepted and compatible lossless format.
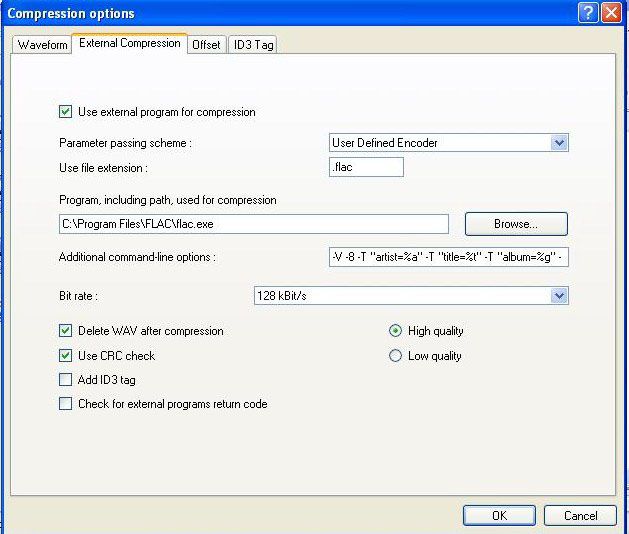
- — Hit the External Compression Tab (see above image).
- — Check Use external program for compression.
- — Under the drop down menu, click User Defined Encoder.
- — Click Browse to find where your FLAC.exe file is installed.
- — Make sure Use File Extension is set to .flac and in the Additional Command Line Options box, put this:
-V -8 -T "artist=%a" -T "title=%t" -T "album=%g" -T "date=%y" -T "tracknumber=%n" -T "genre=%m" %s
- — Check Delete WAV file after compression to save HD space, unless you want to keep them for some reason.
- — Check Use CRC check.
Don’t worry what the Bitrate drop down box reads, it’s irrelevant since we’re using FLAC.
Hit OK to exit the window and save these settings.
Now that everything is set up correctly, make sure to click the EAC Menu in the main window, then Profiles and Save Profile to save all of these settings that you just made.
Proper Ripping
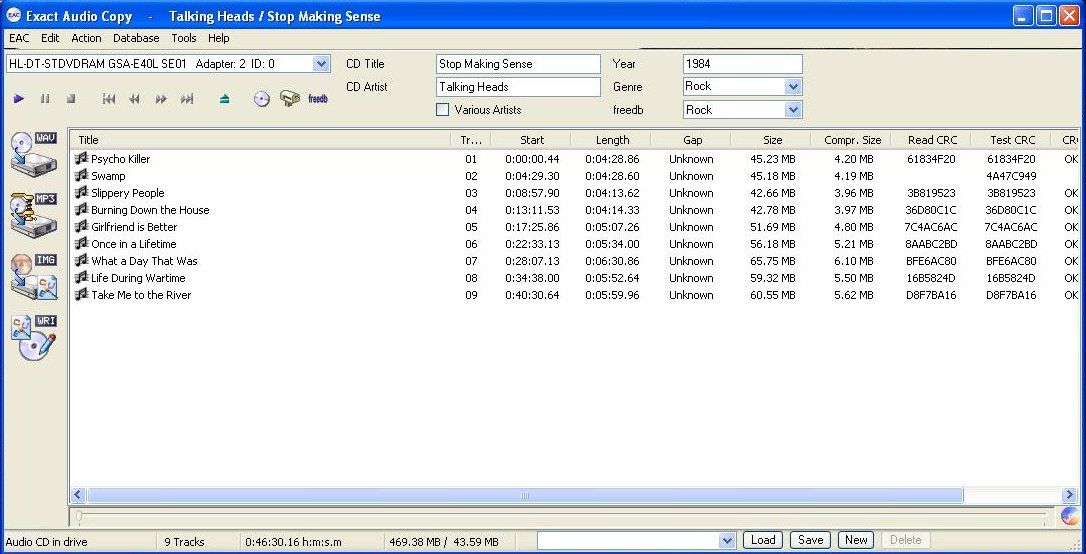
Now that you have your setup all perfect, insert whatever CD you’d like to rip. You should see the FreeDB window pop up and your CD & Track names will be filled in automatically.
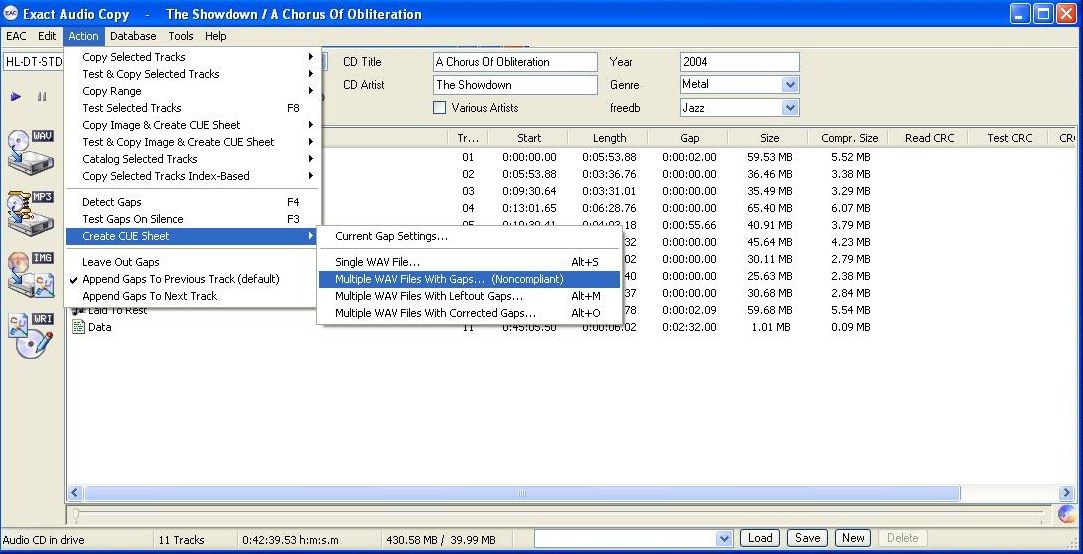
1. Hit F4 to detect gaps for all of the tracks on the CD.
2. Under the Action menu, make sure "Append Gaps to Previous Tracks" is checked. Then go to Create Cue Sheet, then click "Multiple WAV Files With Gaps (Noncompliant)".
3. Hit Ctrl-A to select all tracks, then hit Shift-F6 to rip and compress all tracks on the CD. Alternately, if you are only ripping to WAV, just hit F6.
4. Ripping at this high level of error correction usually takes some time. I’ve seen anywhere from 30-60 min. depending on the disc.
If you didn’t already save a profile of all of these settings, make sure you do so. EAC –> Profiles —> Save Profile.
When it’s done, check your logfile for errors. It has to be a perfect rip to be a suitable upload. DO NOT FORGET TO INCLUDE YOUR .CUE, .M3U & LOG FILES IN YOUR TORRENT!
Much thanks to the original poster on OiNK who made the original tutorial that I revised and used as an outline for this one.
Archived by FSFmirror
![]()
