courtesy of banana6986.
I have had lots of people ask me how to do this, and since it took me about 5 hours to figure it out when I was setting up my server way back when, I feel that this will make it a lot easier for newbies.
Note this is just a general, basic, and easy setup. I recommend you look around and try each server software until you like it. With these instructions, you should be able to easy set up SSL on any ftp server platform.
Some of my settings might not be perfect for your setup, however this will work if you set it up this way. It has been sent out to complete noobs with computers and they were able to set it up easily and get it working…so don’t pm me going it doesn’t work, because you must have done something wrong. Re-read the instructions and set it up.
I know there are other solutions for securing FTP, however this is very easy and better then nothing.
I personally have used numerous software solutions, yet a free and easy solution is filezilla.
Server Side Setup
1. Download Filezilla server software on your server. Click Here.
2. Install with default settings.
3. We will be restricting which IP’s can access the server’s FTP. Click Edit, Settings, General Settings, IP filter.
The top box is where you can block IP’s from accessing the FTP, the easiest method is to build your range and have you ip be excluded, rather then build a custom range around your IP.
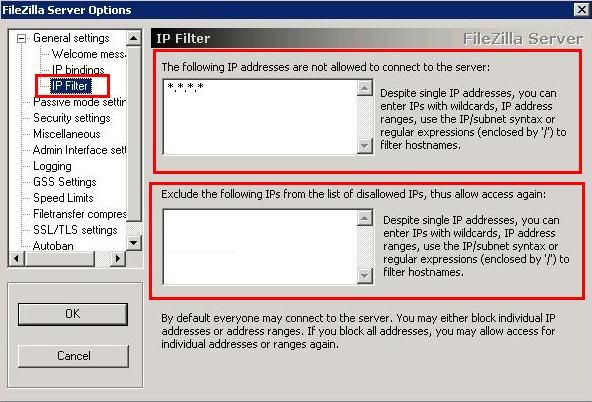
Paste the following into the block list:
*.*.*.*
That will automatically block all IP addresses.
4. Add your IP to the addresses to be excluded from the block, the lower box.
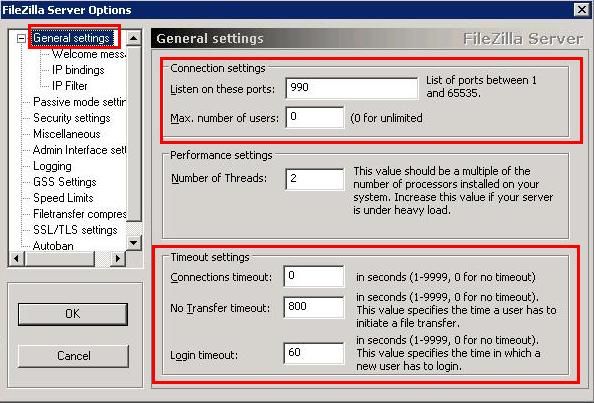
5. Since we are in the general settings, we will tweak a few other things. In the general settings, change the port to 990, Change connection time out to 0, no transfer time out 800, login timeout 60. Those are what I use as the default always messes with some of my friends clients.
6. I personally delete the welcome message, its up to you though.
7. Go to SSL/TLS settings, Check the enable box, check allow explicit box, and check force explicit box.
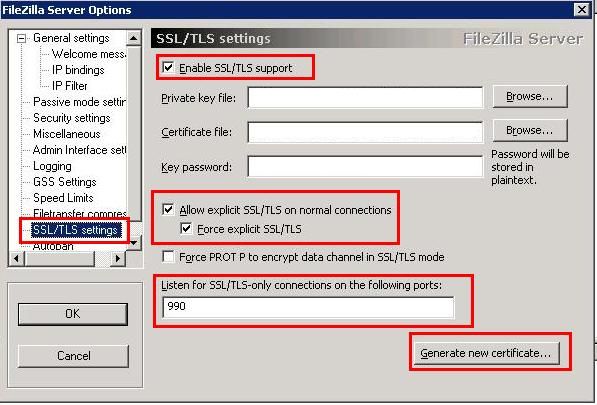
8. Generate a new certificate by clicking the button. I always select the maximum encryption, 4096byte. All the information can be random, EXCEPT for common name (server address), put the servers ip address there. Select where you want to save it, and generate it.

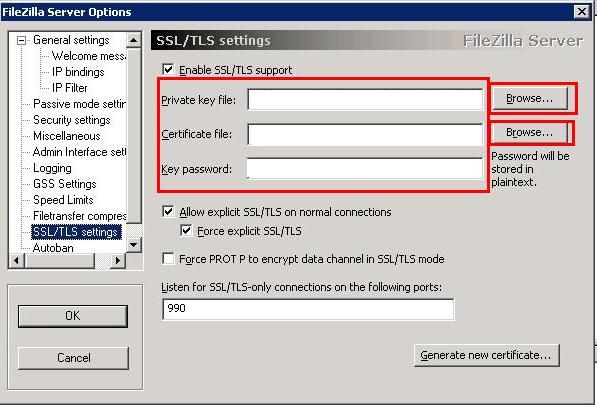
9. Go back to the ssl/tls settings page, for the private key file and certificate file, browse to the certificate you just made. Set a key password. You can finally click ok, as we are done with the server settings.
10. Create a user group: Edit–>groups
11. Click add, make it whatever name you want.
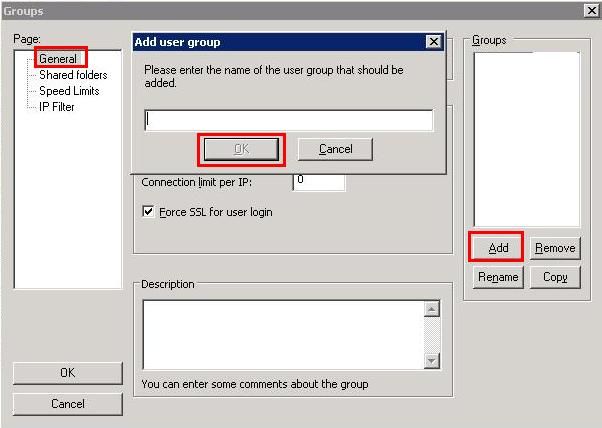
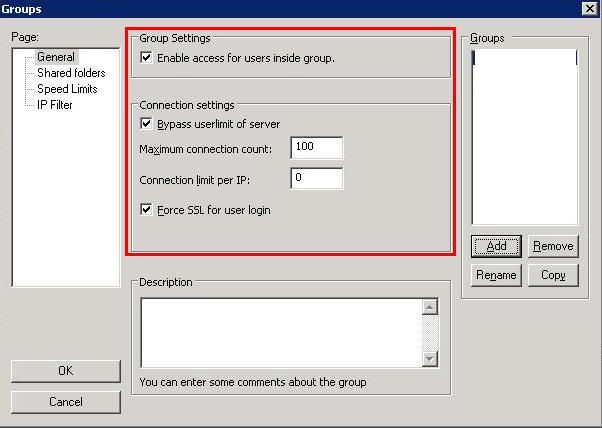
12. Check all three boxes there, adjust max. connection to 100 and connection limit to 0
13. Click the shared folders tab…click add. Select your group on the right, then the add folder button will be the main directory that you will see when you log in. I always just have everything downloaded into one folder and just share that one folder as it is easier.
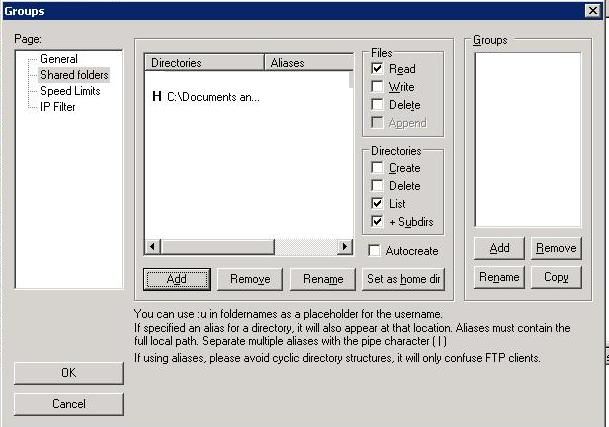
14. Click OK.
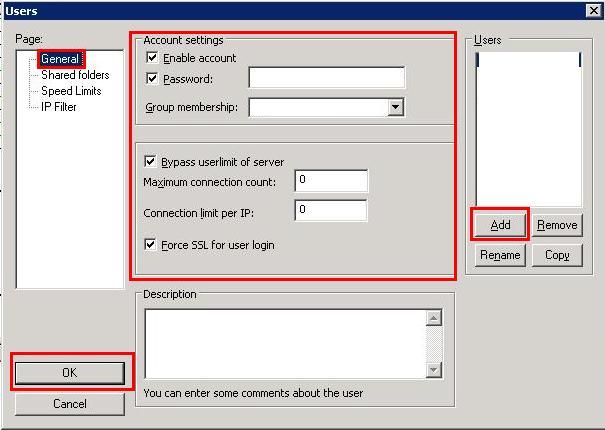
15. Now create a user for your group —-Edit—users
16. Add them, make them a part of the user group you made.
17. Then put checks in all 4 boxes on that screen (enable account, password, bypass server, force ssl) Set max connection count and connection limit to 0 and Click OK.
Now that is the server side…next up is client side.
Client Side:
You can use any client that supports SSL, however I highly recommend using a client like Cuteftp as it takes advantage of multipart download, which is very important if speed means anything to you. For mac users, they also have a mac version of their client. Link is provided below to their overview page.
1. Download CuteFTP professional…Click Here for their home page.
2. After you install it, on startup, it will bring you through the connection wizard. If it doesnt, click the wand with the star under the "file" tab.
3. Host address is your servers IP…click Next.

4. Put in the username and password you made on the server.

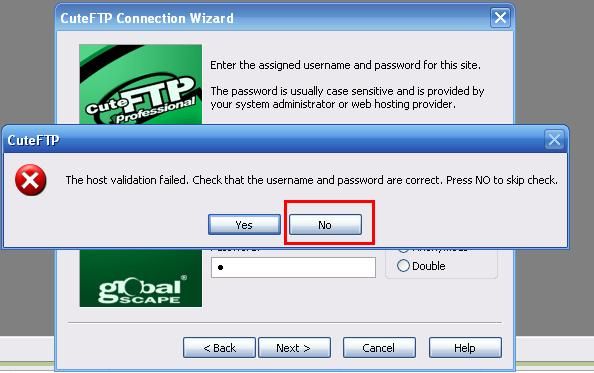
5. When you click next, it will try to verify the server, cancel this. As it wont be able to connect due to the SSL not being set up yet.

Then Click No when it asks to check the username:
6. Click your home directory, local folder, that you want the client to always open to. DO NOT edit the default remote folder, leave it blank, as your server is set up to direct you perfectly to the folder.

7. Click Finish.
8. See the site manager to the left, you should see your server in there, right click on it.

9. Click Properties.

10. Go to the "Type" Tab and you are going to be changing the protocol and port. Change the port to 990.

11. Change the protocol to "FTP with SSL (Auth. SSL –Explicit)" and click connect.

12. The client will now connect to the server.
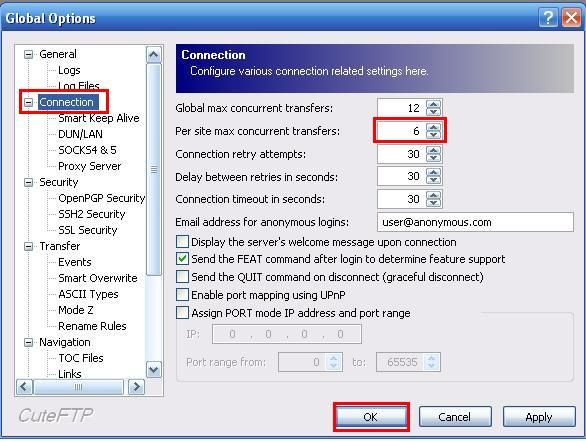
13. Click on the Tools menu and select global options.

14. Select connections, and adjust the max transfers to 6. You can go higher, however 6 runs smoothly on most setups. If you are experiencing slow speeds, adjust this up or down and see how it effects transfer rates.
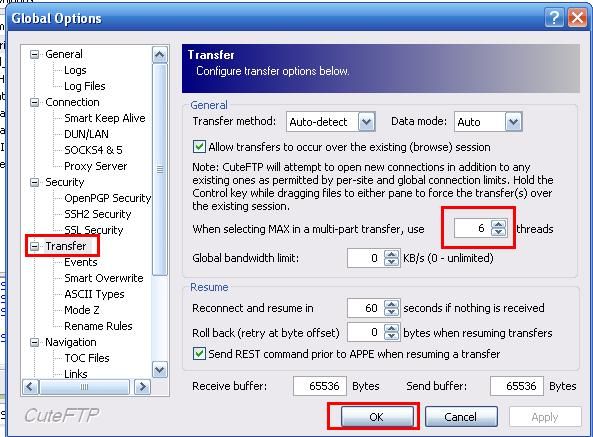
15. Select transfer now and adjust the number of parts to be download at once. The more parts, the faster the download, however as above, it will be specific to your download. I use 6.
16. You should be all set now to proceed to the download. Read below for the fastest download method.
Download
1. After you connect to your server, you will see your home directory and be all ready to just download what you want, right? Yes, BUT without selecting a specific way to download, you will only be downloading 1 connection at a time. Lets take advantage of multi-part downloads.
2. On the folder you wish to download, right click and select Advanced download–>Multipart Download—>Max
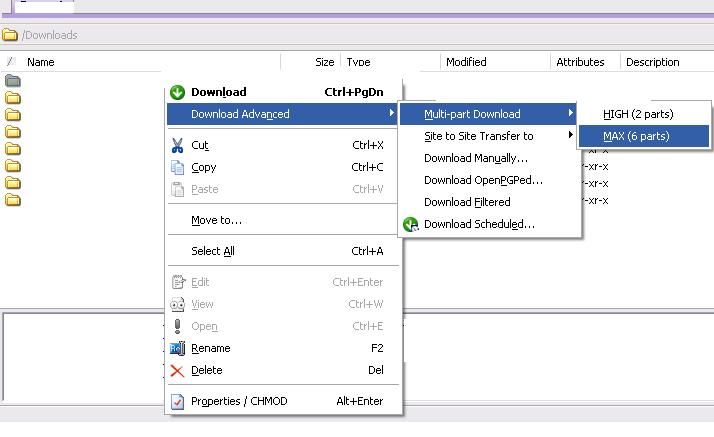
3. Thats the trick. Now you will open up multiple connections to the server and decrease the transfer time by 6 times. (if you left the max connections at 6 as above).
That’s pretty much it. This step by step setup should ensure you a flawless transfer on the first try as it has been tested by 3 other people before it was posted.
Archived by FSFmirror
![]()
