courtesy of Newcomb.
So you have a DVD-Video disc of a live concert (or something of that sort) and you want to extract the audio for your own personal use and to share with all the good people here. This tutorial will explain how this is done properly on a Mac running OS X. I will be using "Dave Matthews & Tim Reynolds - Live at Radio City" and "Neil Young - Heart of Gold" as examples.
There are three codecs commonly found on most DVD-Video concert DVDs. Rarely will a disc contain more than two of these so don’t be surprised is one or more are not present.
PCM Audio - This is the only lossless codec of the three. It will always be 2 channel. This is also the only one that can be encoded to FLAC or MP3 and uploaded here without breaking the transcode rule. Not all discs will contain PCM so not all can be uploaded in FLAC or MP3. I believe PCM to be the equivalent of a headerless WAV file.
DTS Audio - This is the highest quality of the multichannel formats. I have never came across this codec in anything other than a 6 channel mix. These files will typically have a bitrate of 1536 kbps. or 768 kbps. These files will be lossy and should not be transcoded to FLAC or MP3 and uploaded here but what you do for your own personal use is your business. However, these files can be uploaded in their original format as long as the file names contain the song names, track numbers and the folder is titled correctly.
AC3 Audio - This is the most common of the three and is also referred to as Dolby Digital. These files can be either 6 channel or 2 channel. The 6 channel seems to be most commonly at a bitrate of 448 kbps. and I have seen the 2 channel range from 448 kbps. to 192 kbps. These files will be lossy and should not be transcoded to FLAC or MP3 and uploaded here but once again, do what you will for your own personal use. These files can be uploaded in there original format just rename the files correctly. According to the rules at this time the 2 channel files are not allowed because they are not a "Multichannel" mix.
There are a few applications needed to complete this process. Not all are free but are very affordable. They are as follows:
MacTheRipper - This is the Mac standard for backing up DVDs. It will be used to demux and extract the files. Version 2.6.6 is freeware but the beta versions of 3.0x are donationware. If you donate to the cause they will send you a license. I will be using MacTheRipper 3.0r14d for this tutorial. I believe the best way to donate and get the latest and greatest beta version is through the MacTheRipper forum at ripDifferent.com. Check your favourite BitTorrent site for a cracked version of 3.0x - it’s definitely around.
AIFF from PCM v1.0b11 - This will be used to convert the extracted PCM audio files to AIFF. This application is freeware.
xACT v1.62 - This will be used to encode the AIFF files to FLAC, create a checksum file and add Tags. This application is freeware. I would suggest using XLD to encode to LAME MP3. I won’t go over that process as it is quite easy and I believe there is already a tutorial on FLAC > MP3 V0 on Mac OS X.
DVD2ONEX - I currently use this to identify the bitrate of the files i am going to upload. This application is NOT freeware (although, with a little research you can probably find it on a BitTorrent site). However, it is rather inexpensive and is a great tool for compressing a DVD so it will fit on a single layer disc.
PCM EXTRACTION & CONVERSION
So, lets extract and encode some PCM audio.
STEP 1: Insert the DVD-video disc you want to extract the audio from into your DVD drive and open MacTheRipper. It may take several seconds for MacTheRipper to read the DVD so be patient. You will see the name of the DVD listed in the GUI once the app is ready.

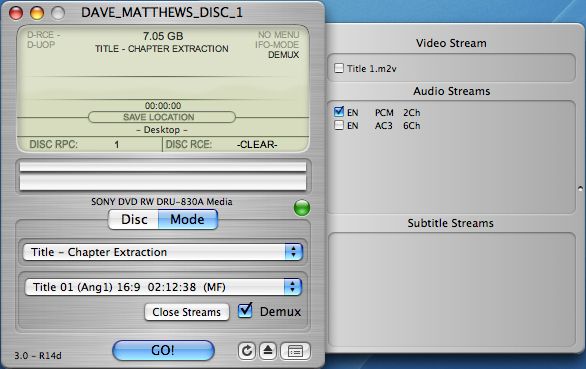
STEP 2: Click on the "Mode" button. You will see that the pull down menu is currently showing "Full Disc Extraction".

STEP 3: Click on the pull down and choose "Title - Chapter Extraction". Choose the main feature (MF) from the second pull down menu. This will cause the GUI to expand revealing the chapters that the title contains. Make sure you UNCHECK the "Merge Chapters" check box. Failing to do this will give you one big file rather than breaking the DVD up by chapter (songs). You can uncheck any of the chapters you do not want although you will most likely want all of them if you want the whole concert. I have had some issues with DVDs that contain multiple angles so you will have to play with this process a little if you have problems with one of those.

STEP 4: Click the check box to the left of "Demux" and then click on the "Open Streams" button. This will reveal the video, audio and subtitle streams that exist in the chapter(s) you selected. Uncheck the video and subtitle streams and any of the audio streams you don’t want but leave the PCM stream checked. If you want more than one audio stream leaving all that you want checked will give you a full set of files for all formats checked, saving you from going through this process several times. Click on "GO!" , select your output location and MacTheRipper will perform its magic.
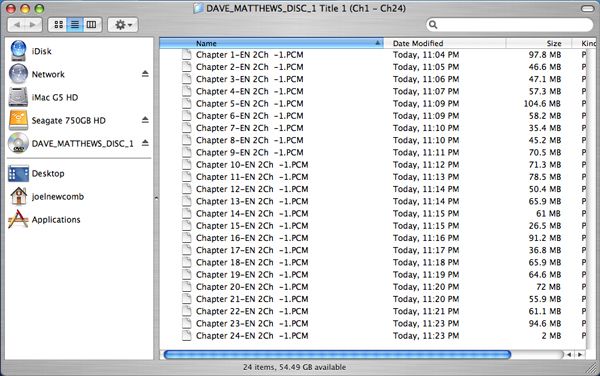
You will be left with a folder containing the extracted PCM files. You will also get an empty "Video_TS" folder. It can be deleted.
STEP 5: Open AIFF from PCM. Choose the correct sample size and sample rate of the files you wish to convert. I have yet to find an app. that will give me this data about the raw PCM files so you may have to make an educated guess. I have found that most DVDs contain either 16 bit / 48 kHz steams or 24 bit / 48 kHz streams but I have been told that some could contain 24 bit / 96 kHz streams. Some 24 bit files may also need "Swap bytes" checked. This has to do with the byte order which will either be big endian (bytes are numbered from most-significant to least-significant) or little endian (bytes are numbered from least-significant to most-significant). A complete explanation of this can be found here. I would suggest that you try out one file and once it has converted give it a listen. In many cases the wrong settings will still output AIFF files but they will be filled with heavy static. Once you have confirmation of the correct settings, add all of the files you wish to convert. Click on the "Convert" button and choose an output location.

Your output folder will contain all of the AIFF files once the conversion is complete.

STEP 6: Open xACT v1.62. Click on the "Encode" tab and add all of the AIFF files you wish to encode. Click on the "Flac Compression" radio button and move the dial to "Level 8". Check the box next to "Verify" and click the "Encode" button. Choose an output location and click save.

Your output folder will contain all of the FLAC files once the encoding is complete. Do not downsample the files to 44.1 kHz. Although this is not against the rules most people will prefer FLAC files that are the same sample rate as the original. The downloader can always convert to 44.1 kHz for CD-R later if they want.

STEP 7: Change the folder name and file names so that they comply with Waffles rules. Create a checksum (.ffp) file and and add Tags (song name, album name, etc.). This can all be done using xACT. You now have a finished product that can be uploaded here on Waffles. It is not necessary to get the bitrate of the PCM audio as it is lossless but you can use DVD2ONEX to get that data if you wish.

AC3/DTS EXTRACTION
Next, lets extract some AC3 audio (the process is the same for DTS):
STEP 1: Insert the DVD-video disc you want to extract the audio from into your DVD drive and open MacTheRipper. It may take several seconds for MacTheRipper to read the DVD so be patient. You will see the name of the DVD listed in the GUI once the app is ready.

STEP 2: Click on the "Mode" button. You will see that the pull down menu is currently showing "Full Disc Extraction".

STEP 3: Click on the pull down and choose "Title - Chapter Extraction". Choose the main feature (MF) from the second pull down menu. This will cause the GUI to expand revealing the chapters that the title contains. Make sure you UNCHECK the "Merge Chapters" check box. Failing to do this will give you one big file rather than breaking the DVD up by song. You can uncheck any of the chapters you do not want although you will most likely want all of them if you want the whole concert. I have had some issues with DVDs that contain multiple angles so you will have to play with this process a little if you have problems with one of those.

STEP 4: Click the check box to the left of "Demux" and then click on the "Open Streams" button. This will reveal the video, audio and subtitle streams that exist in the files you selected. Uncheck the video and subtitle streams and any of the audio streams you don’t want. However, if you want more than one audio stream leaving all that you want checked will give you a full set of files for all formats checked saving you from going through this process several times. For this example I will only be choosing the 6ch AC3 stream. Click on "GO!" , select your output location and MacTheRipper will perform its magic.

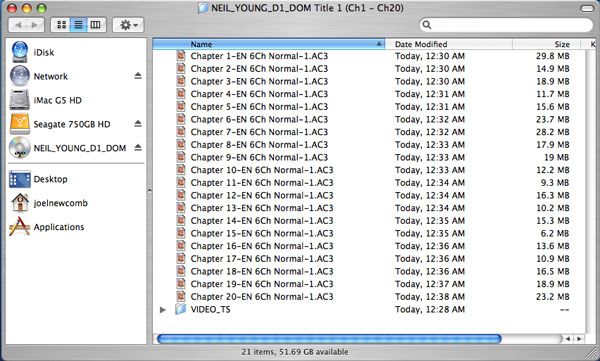
You will be left with a folder containing the extracted files. You will also get an empty "Video_TS" folder. It can be deleted.
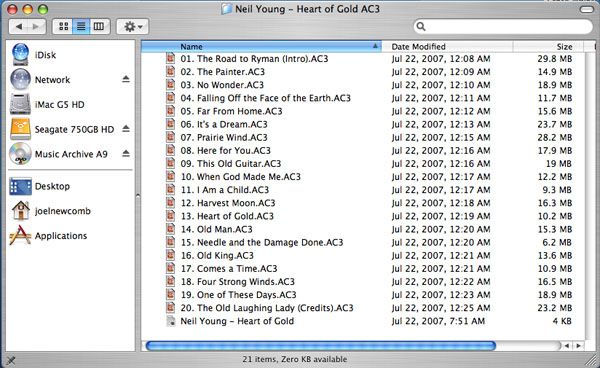
STEP 5: Change the folder name and file names so that they comply with Waffles rules. DO NOT transcode these files to any other format. They are already lossy and doing so will break a very important rule. You now have a finished product that can be uploaded here on Waffles.
STEP 6: In order to get the bitrate data from DVD2ONEX you will need to have completed a "Full Disc Extraction" out of MacTheRipper. Open the Video_TS folder in DVD2ONEX and click the audio directory. The bitrate of all audio formats will be shown.

That’s it!
Archived by FSFmirror
![]()
