January 04, 2008 by sharky
AudioGnome![]()
JLop
Lopster![]()
Napster![]()
SunshineUN
Utatane
WinMX![]()
XNap
![]() OUR PICKS
OUR PICKS
OpenNap is a peer-to-peer (P2P) service server. It was created as an ‘open source‘ Napster server, extending the Napster protocol to allow sharing of any media type (instead of just *.mp3 files), and adds the ability to link servers together. Today, OpenNap is still used the same way - all shared files are kept on each client’s machine but searching and indexing must pass through a central server (known as a centralized server) or group of servers. This is in direct contrast to Limewire and other second or third generation P2P services that are decentralized (and are much more difficult to shut down).
One cool feature about OpenNap servers is that they are compatible with many different OpenNap clients. So if you find some good servers in AudioGnome, try adding them to Napster, Lopster or WinMX (and vice-versa).
OpenNap Servers (list)
Most OpenNap clients require the addition of servers to connect to (with the exception of AudioGnome). There aren’t many websites around where you can find lists of current (valid) servers, although the best site for this is www.gotnap.com (click on the ‘Serverlist’ link). Another site with OpenNap servers is http://kosaba.hp.infoseek.co.jp/, although they remain untested.
OpenNap Clients
An OpenNap client is a P2P application used to connect to the servers. While clients are not in short supply, it is the servers that they connect to that are sparse. Check out this link for a larger list of past & present clients.
If you’re already experienced in OpenNap, we probably don’t have to mention WinLop, TekNap, Gnutmeg, or any other client that we find to be too complicated for the average user. If you’re new to OpenNap, stick to the client programs we reviewed below.
OpenNap External Links
 http://opennap-ng.sourceforge.net/ - a list of clients for OpenNap (cross-platform)
- http://www.slyck.com/winmx.php - Slyck’s guide to WinMX
- http://opennap.sourceforge.net/ - OpenNap’s homepage on SourceForge
- http://www.gotnap.com - Gotnap’s updated OpenNap serverlist
- http://serverlist.run.buttobi.net/ - Japanese OpenNap serverlist (list is kept up-to-date - content/genre unknown)
Network/Server clarification:
An OpenNap Network is a collection of one or more servers within that network. Thus if a network is down, so are all of its servers. Simply put, an OpenNap server is a peer, or node - someone who is running a server on a particular network that is helping out in file distribution between all of the peers. SlavaNap is software that can be used by anyone who wants to run a server on an OpenNap network.
Here’s our non-exhaustive list of some of the P2P file sharing programs that connect to OpenNap networks & servers:
 AudioGnome v1.0.16 (for Music)
AudioGnome is a client that allows you to connect to multiple OpenNap servers and other related servers that are set up and run by music lovers. This is a throwback to the dinosaur days of Napster, however, at last check (Jan ‘08) there were 16,500 users online (sharing 26,000,000 songs) - proof that this is utilized by some serious hard-core music fans. PROs: Good columns for sorting music - bitrate/size/link speed. Much of the music is of excellent quality (320 bitrate/VBR). CONs: All connections are one-on-one with other users - queued downloads are common.


AudioGnome installation: Download it here (click on “Active Installer”) and run. Follow the on-screen instructions - it will need to connect to a server to update some files.
Our Notes: We like AudioGnome since it’s less complicated to set up than Napster or WinMX - it updates the servers at the end of installation without further intervention - great for Noobs!
JLop (Java Lopster) v1.05.264 
Recommended for experienced OpenNap users only.
We were going to do a big entry here on JLop, but their website does a better job of explaining how it works. JLop has some great OpenNap features since it’s a recently developed OpenNap client - users can connect to all of the servers at the same time; multiple-format lists can be imported (Napigator: servers.list, WinMX: servers.wsx); and many more features.
Our Notes/installation:
Requires the latest version of Java. JLop doesn’t have an installation or *.EXE file - it must be run under a pure Java environment. This means you’ll need to launch the *.JAR file from a run command and enter a java path to the file, or you may just be able to double-click on JLop.jar if your Java environment is already running. To run JLop from a run command, follow these steps:
1. Download the JLop package (.zip). Extract all files to C:\JLop (for simplicity).
2. In WinXP, go to START BUTTON > PROGRAMS > ACCESSORIES > COMMAND PROMPT. This will launch the DOS-style command prompt. Now,
3. Direct yourself to the C:\JLop directory and type in this line, and hit ENTER (see screenshot below):
java -jar JLop.jar
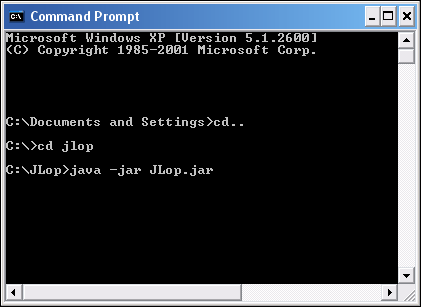
JLop will now start (assuming Java is already installed.)
Adding servers to JLop:
For this example, to add server lists into JLop, visit www.gotnap.com/servers.wsx (a WinMX server list) and save it to your hard drive. In JLop, click the Networks tab and then click “Import wsx” at the left. Now browse to the servers.wsx file that you saved. They should now update - you can click the “Select all” button and then “Connect sel” to begin connecting to all of them. (Be sure to add a shared folder in the “Config” tab first - or you’ll be banned from most servers).

 Lopster v1.2.2
(Very Special thanks to Smokerillo)
Lopster is a filesharing client that formerly connected to the Napster and WinMX networks, but it has been reborn onto OpenNap servers everywhere! Features include: multiple-server connectivity, easily updatable serverlists (without having to visit external websites such as GotNap.com), and good search filtering options all make Lopster a winner!
Lopster Installation:
NOTE: We ran into some difficulties configuring the Lopster client that is currently being offered at their sourceforge webpage. The Rillonap forum has come up with a customized installation package for Lopster that works marvellously; simply follow these instructions:
A proper working version of Lopster is available from the Rillonap P2P Forums. Click on the “Lopster” forum link. For Windows OSes, select the ‘Windows Installer Available’ and then click Lopster Win32 Install Package link. Download and install. During installation, you’ll need to enter a username and password to properly configure Lopster. If you have any problems running Lopster, you may need to restart your computer after installation.
Configuring Lopster:
Run Lopster from the start button or the desktop shortcut. Click on the “Server” menu button on the left. Now, right-click in the server window (under where it says NAME) and select “Refresh List”. This will update all the supported servers on the OpenNap network. (TIP: Do this every time you run Lopster to update the servers).

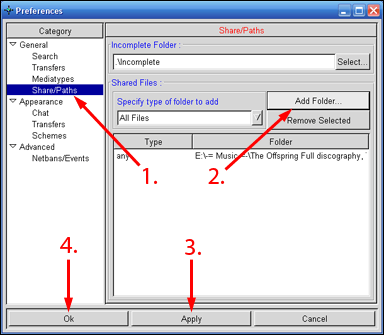
Before you jump in and start connecting to servers, make sure that you’ve set up a shared folder, or risk being banned by most servers. To do this, select NAPSTER > PREFERENCES… and then select “Share/Paths” and click the “Add Folder…” button. Browse to a music directory, click OK, then click APPLY and OK to finish.

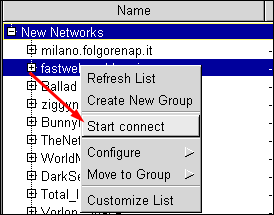
To connect to a server/network, go back to the “Server” button, right-click on a network and select “Start connect”. You can do this for as many as you like.
Statistics for the number of connected networks, users and number of shared files all appear in the bottom of Lopster, and this is inclusive of all connected networks. So for better search results, connect to as many networks as possible.

Keep an eye on the Lopster homepage - new work is being conducted on Lopster 2 which will incorporate Direct Connect and SoulSeek into the list of supported networks. Lopster I and Lobster II forums can be found here.
 Napster
(Special thanks to Smokerillo)
Ever wanted to see how file sharing got started, or maybe just take a stroll down memory lane? Well, you can - with the original Napster client! While the old Napster network is long gone, Napster still works and has many diehard users - on underground OpenNap networks.
Napster Installation:
NOTE: This installs the old (original) Napster - the exact same one that was shut down in July, 2001 - and has nothing to do with the newer legal pay-service Napster at www.napster.com run by Roxio, Inc.
Download the package from here. Unzip to a temp directory on your hard drive. There are five files in the zip - two of them are “Napster Installation” files (napster2b5.exe and napster2b10.exe).
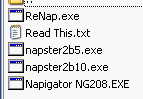
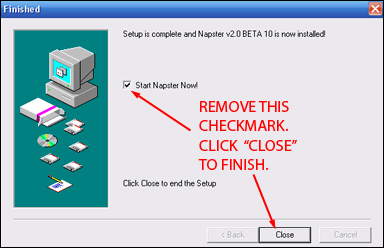
1. First, install only one of the Napster Installation files (napster2b5 or napster2b10). For this, we chose the 2b10 version. Important: At the end of the installation, do not run Napster - so remove the checkmark from the box as shown below:
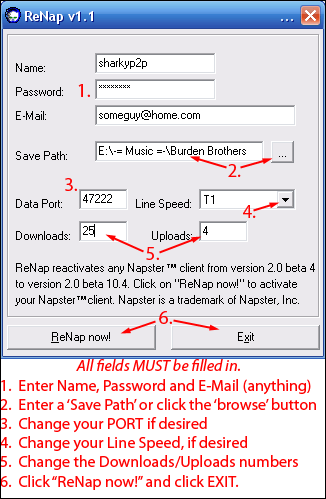
2. Run “ReNap.exe” and choose a username and password and change other settings, if you wish. Enter an email address (doesn’t matter what) and make sure you add a shared folder with music in it (leeching is not permitted or you’ll be banned by the servers). NOTE: All fields must be filled in before you click “ReNap now!” - see below:
3. Now, run “Napigator NG208.EXE” and install. At the end of installation, read it carefully but select “NO” and “NO”.
4. After installation, Napigator may or may not launch. If it does, it should also launch Napster - if it doesn’t, run “Napigator” from your Start Button:
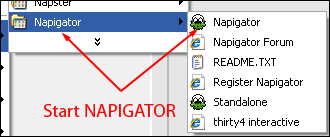
(Technically, Napigator is just an addon/plugin for Napster that allows you to import servers and server lists).
5. IF YOU DID EVERYTHING SUCCESSFULLY up to this point, Napster should launch and you will see this screen below. There are three criteria you should look for:
1. Your username is listed in the bottom left (with Online status).
2. The shared files you added (in ReNap.exe) are listed in the My Files menu.
3. There is a “Napigator” icon (button) at the top right side.

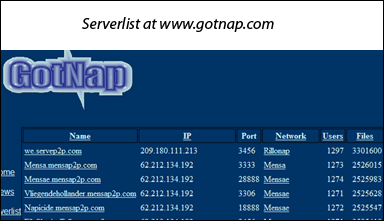
6. Good, we’re getting there. Leave Napster running. Next, you’ll need to add some servers to connect to. For this, we recommend you visit www.gotnap.com (in your browser). Click on the Serverlist button to the left - see below:

This will open a link as shown below:
7. Go back to your Napster window (Step 5) and click the Napigator button. This will open the Napigator window, as shown below.

Next, click the “Bookmarks” tab (in the top menu - see screenshot above) and select “Add Bookmark”. A new window will now open (see below).
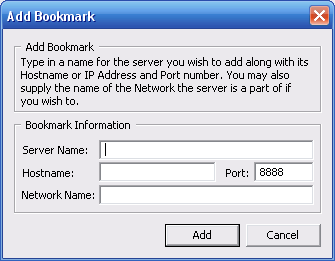
8. You’ll need to enter ALL FOUR entries from one of the servers in the gotnap.com/serverlist page, into the added bookmark. Note that the NAME should be used for BOTH the “Server Name” and “Hostname“. In our example below, we’ll use the first server - Mensae.mensap2p.com
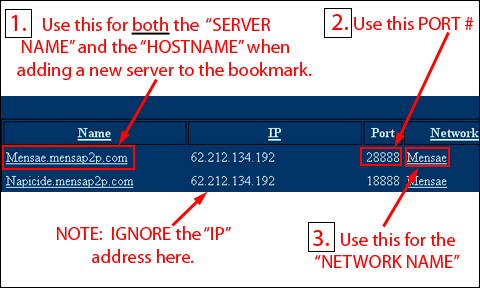
1. Name (this is both the Hostname and the Server Name to be used in Napster) - i.e. Mensae.mensap2p.com
2. Port (this is the Port: number in Napster) i.e. 28888
3. Network (this is the Network Name in Napster) i.e. Mensae
So put these four things into your added bookmark, like below (click the ‘Add’ button when done):
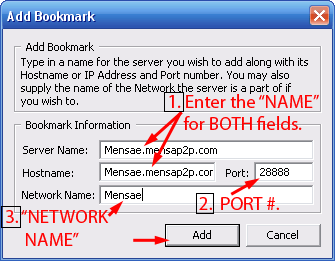
NOTE: Ignore the “IP” number in the gotnap/serverlist page. Some servers have dynamic IP addresses. It is the server name that is relevant. A properly added server will automatically update it’s IP address in Napster when you reconnect to it. Therefore adding servers by their IP is not recommended - should it happen to change, you’ll likely not be able to re-connect to it again unless you remove it and re-add the server again from Gotnap. Stick with the names of the servers, instead.
9. Whew! Almost there. In Napster, look to the bottom and click on the ‘Bookmarks’ tab (see image below). The newly added server will show up there.
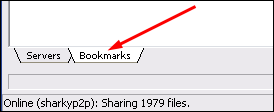
Now, if it was added correctly, you’ll see the new server listed like this:
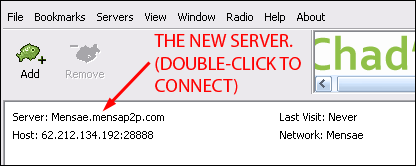
To connect to the added server, double-click it, it should turn green and begin to update. If successful, you’ll get this message:

Congratulations! (Welcome back to 1999!) You are now logged in to Napster on OpenNap! You can add as many servers as you like - repeat steps 6 - 9 with different servers from the gotnap.com/serverlist page. (we recommend doing this).
Here’s the search window in Napster: Check out those beautiful MP3 bitrates!

- And here’s a link to the underground Napster forums.
SunshineUN v1.4.1.2-Beta
 SunshineUN is another program/client that connects to OpenNap/SlavaNap servers - download it here (the file is “SunshineUN-1.4.1.2-Beta-4.1-2.exe”). Servers are added to the application using the same procedures as with Napster and WinMX (from the www.gotnap.com website). We don’t recommend SunshineUN unless you find servers that will only run on Sunshine, and not on other OpenNap clients. (We found that you can only connect to one server at a time - greatly reducing search results unless you want to switch back and forth). A serverlist can be found here for SunshineUN, but we found no method available to import the list. See their homepage for additional info.
Utatane v0.253 (English Version)
Utatane is a Japanese file sharing program that connects to OpenNap networks. Download the English package here - it comes with a great help page after the installation. It requires the addition of ’servers’ to the list - same as with all OpenNap clients (see our WinMX instructions).
XNap v2.5r3
 We won’t spend much time on this one, because as a stand-alone, we only generated 400 search results for .mp3 files. Interestingly - they were all high-quality .mp3 files (320 bitrate) so XNap peers know a thing or two about music, and downloads were zippy. XNap requires Java, and it complained that we didn’t have java installed on the system (which we do) so we opted to ‘run anyway’ which it did. XNap (by default) connects to the OpenNap network, yet there’s a long list of plugins for it that support other networks (Gnutella, giFT, OverNet etc.) which we did not configure. If you have some spare time on your hands and consider yourself an advanced computer user, give XNap a whirl. If all else, we always have fun connecting to networks that have a tiny fanbase and are practically invisible to the rest of the world!
NOTE: We had some java problems when running XNap a second time. If you’re looking for something that connects to the OpenNap network, use AudioGnome - it updates a nice server list after installation, or use WinMX or Napster.
 WinMX
WinMX
WinMX was officially abandoned by it’s parent company (FrontCode) in Sept. 2005, and the rights were bought by MusicLab who also owns BearShare (you know, the new legal BearShare lamers) and Shareaza (version 4 pay-to-use version). Most older versions just won’t connect (being that the online server lists have been removed - with this great exception to the rule).
Newer versions will likely be set up to charge money for downloads - see here for an example of that.
So you think WinMX is dead and buried, then? Think again. It’s buried, but it’s anything but dead - just gone completely underground. Right now there are a paltry 23,000 users on the OpenNap/WinMX networks - sharing a whopping 36,721,383 files! (mostly high-quality music files). That’s not chicken-feed - it’s a decent number of files for a network that doesn’t really even exist to most file sharers. And I really wouldn’t worry about the RIAA coming after you - they have bigger fish to fry.
Want to get in on the action? We do! We love joining stuff that’s supposed to be long gone. It’ll take a few steps, but well worth it.
WinMX Installation:
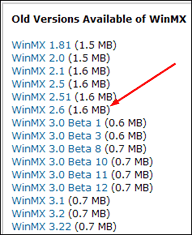
You’ll need an older version of WinMX for this to work. Stay away from any Google searching for this - you’ll just get sucked into those wretched pay sites. Visit www.oldversion.com and search for WinMX (or just click our link). Select a version you see there - not the oldest one and not the newest (we chose v2.6 - it works great for this). See below:
1. Download and install - follow onscreen instructions. It doesn’t matter if WinMX tries to connect at the end of installation or not - it won’t anyways.
2. Run WinMX. You’ll need to set up a sharing folder - this is mandatory or you’ll get banned from the servers, so do this before you try to connect to them (leeching is not allowed - it’s no wonder there’s so many people sharing files!) If you didn’t already set up a “shared folder” during setup, now’s the time. Click on the Shared Files button, then click ‘+ADD PATH‘. Browse to a folder that you wish to share (make sure it’s not empty). See below.

3. You need to add some underground servers to connect to. For this, we recommend you visit www.gotnap.com (also, see our shortcut below). For this procedure, click on the Serverlist button to the left.
4. This will open a link as shown below. OK, look for one that has lots of users, now highlight the IP number (i.e. - 209.180.113.213) and copy it to the clipboard. If you have no idea what I’m talking about, just write it down on a piece of paper. You’ll also need the PORT number as well. (You can add them all if you like - but it will have to be done one at a time).
NOTE: The ‘IP’ doesn’t necessarily have to be a number - it can also be a name (i.e. - cruisecontrol.dyndns.org).
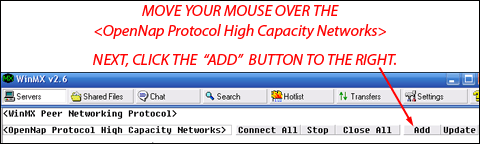
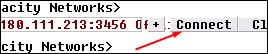
5. Go back to WinMX. Click the SERVERS button at the top left. Next, move your mouse over the area that says:
<OpenNap Protocol High Capacity Networks>. It should appear like this:
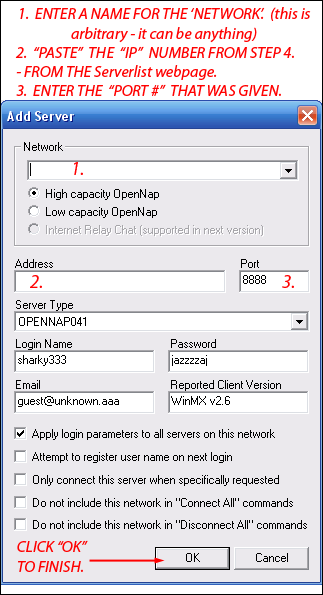
This should now open a new window as shown below. Enter a name for the “Network” and enter the IP and Port numbers from step 4 as shown. Click ‘OK’ to save the changes.
6. The server should now be listed, and the status will say “OFFLINE” - move your mouse over the newly added ‘Network’ and click the “Connect” button.

7. Your ’shared’ file statistics will go through first, then the Network status should turn to green, saying “Ready”. If this didn’t work, then the server is down. Go back and get a different one from Step 4.

You are now ready to search for files. Click the “Search” button at the top to launch the search page. If you want to add more Networks, go back to www.gotnap.com and enter as many as you like, repeating steps 4 - 7 for each one (we recommend doing this to get more search results and more users that are sharing the same files). Also, servers can tend to temporarily ‘go down’ once in a while so by adding a whole bunch it won’t affect the performance of WinMX much.

That’s it! Have fun with WinMX.
Our WinMX Tip:
Want to know a shortcut instead of having to add the servers one by one? It’s easy! Visit www.gotnap.com/servers.wsx and save the file (servers.wsx) to your hard drive (desktop or wherever). Next, launch WinMX but minimize it. Now, just drag and drop the servers.wsx file to your WinMX desktop icon. This will import the list. Go to WinMX and click the “Servers” button on the left - all the servers should now be listed there. (You’ll have to connect to each of them one by one, though.) Servers come and go, so check back at the above link for the most current server list.
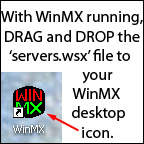

Note that the servers listed in the ’servers.wsx’ file are specific to WinMX and vary from the ones listed at www.gotnap.com/serverlist (which contain general OpenNap/SlavaNap servers). Both methods can be used to add servers.
Other WinMX Links:
Check out www.winmxworld.com for other WinMX information and tutorials.
The MXPie ‘WinMX’ Patch:
Another site worthy of mention is http://www.mxpie.info/. They offer a ‘patch’ to WinMX v3.53 to get it properly working. Click on their instructions tab to learn how. Our Notes: This is a great patch! Not only does it patch WinMX v3.53 - it allows it to actually connect to the WinMX Peer network - not just OpenNap servers! Search results were excellent (1,420 search results for ‘Metallica’ alone). See our article in ‘Other Methods of P2P‘ for full details!
And here’s another website that offers an even better patch solution to WinMX.
Archived by FSFmirror
![]()
